Create a Jira ticket
Create a Jira ticket when validation requires attention using an HTTP request workflow step.
Prerequisites
Configure workflow step for Jira ticket creation
In the left sidebar, click Settings.
Under Governance, select Workflows.
Click Add Workflow:4
- Under Workflow Target type, select Inventory Record.
- Enter a Title and a Description for the workflow.
- Select the Record Type this workflow applies to.
- Under Workflow Start, select when the workflow should be initiated.
- Under Workflow Expected Duration, define the SLA for the workflow based on the start date in days, weeks, months, or years.
Click Save Draft to save your blank workflow.
Configure the rest of your workflow steps, then drag and drop an HTTP Request step5 onto the canvas and connect it to your workflow.
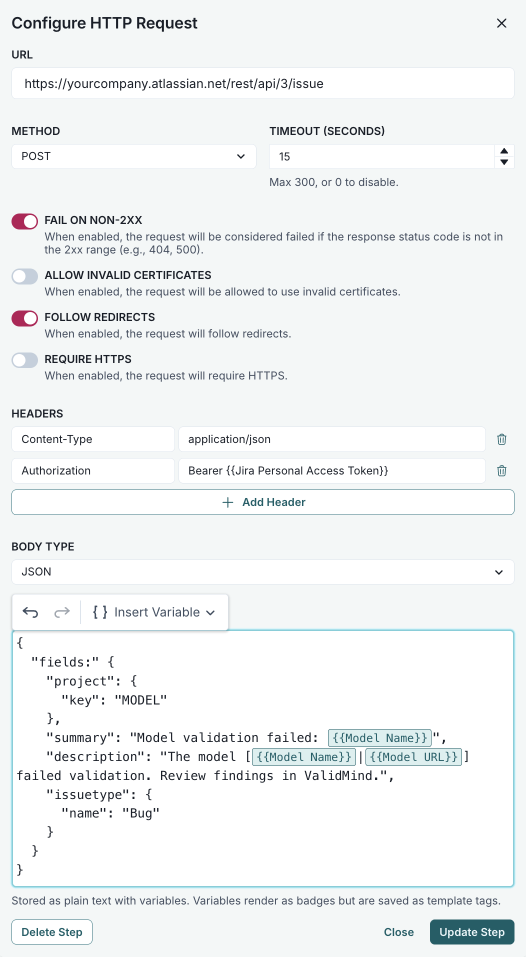
Double-click the step to open the Configure HTTP Request modal.
Configure the required fields for Jira,6 replacing the placeholder values with your own:
- URL —
https://yourcompany.atlassian.net/rest/api/3/issue - Method — POST
- Headers — Add:
Content-Type:application/jsonAuthorization:Bearer {{Jira Personal Access Token}}
- Body Type — JSON
- Body — Use the following JSON payload:
{ "fields": { "project": { "key": "MODEL" }, "summary": "Model validation failed: {{Model Name}}", "description": "The model [{{Model Name}}|{{Model URL}}] failed validation. Review artifacts in ValidMind.", "issuetype": { "name": "Bug" } } }- URL —
Click Update Step to save your configuration.
Configure and link any additional workflow steps.7
Save your workflow to apply your changes.
Publish your workflow to make it available for use.
The HTTP request to create the Jira ticket is sent when the workflow executes the step.