%pip install -q validmindValidMind Introduction for Model Developers
As a model developer, learn how the end-to-end documentation process works based on common scenarios you encounter in model development settings.
As a prerequisite, a model documentation template must be available on the ValidMind Platform. You can view the available templates to see what templates been set up for your organization.
This notebook uses a binary classification model as an example, but the same principles shown here apply to other model types.
Overview of the notebook
1. Initializing the ValidMind Library
The ValidMind Library provides a rich collection of documentation tools and test suites, from documenting descriptions of datasets to validation and testing of models using a variety of open-source testing frameworks.
2. Start the model development process with raw data, run out-of-the box tests, and add evidence to model documentation
Learn how to access ValidMind’s test repository of individual tests that you will use as building blocks to ensure a model is being built appropriately. The goal is to show how to run tests, investigate results, and add tests results or evidence to the documentation.
For a full list of out-of-the-box tests, see Test descriptions or try the interactive Test sandbox.
3. Implementing custom tests
Usually, model developers have their own custom tests and it is important to include this within the model documentation. We will show you how to include custom tests and then how they can be added to documentation as additional evidence.
4. Finalize testing and documentation
Learn how you can ensure that model documentation includes custom tests and how to make test configuration changes that apply to all tests in the model documentation template. At the end of this section you should have a fully documented model ready for review.
Contents
- Overview of the notebook
- About ValidMind
- 1. Initializing the ValidMind Library
- 2. Start the model development process with raw data, run out-of-the box tests, and add evidence to model documentation
- 3. Implementing custom tests
- 4. Finalize testing and documentation
- Where to go from here
- Upgrade ValidMind
About ValidMind
ValidMind is a suite of tools for managing model risk, including risk associated with AI and statistical models. You use the ValidMind Library to automate documentation and validation tests, and then use the ValidMind Platform to collaborate on model documentation. Together, these products simplify model risk management, facilitate compliance with regulations and institutional standards, and enhance collaboration between yourself and model validators.
Before you begin
This notebook assumes you have basic familiarity with Python, including an understanding of how functions work. If you are new to Python, you can still run the notebook but we recommend further familiarizing yourself with the language.
If you encounter errors due to missing modules in your Python environment, install the modules with pip install, and then re-run the notebook. For more help, refer to Installing Python Modules.
New to ValidMind?
If you haven’t already seen our Get started with the ValidMind Library, we recommend you explore the available resources for developers at some point. There, you can learn more about documenting models, find code samples, or read our developer reference.
For access to all features available in this notebook, create a free ValidMind account.
Signing up is FREE — Register with ValidMind
Signing up is FREE — Register with ValidMind
Key concepts
Model documentation: A structured and detailed record pertaining to a model, encompassing key components such as its underlying assumptions, methodologies, data sources, inputs, performance metrics, evaluations, limitations, and intended uses. It serves to ensure transparency, adherence to regulatory requirements, and a clear understanding of potential risks associated with the model’s application.
Documentation template: Functions as a test suite and lays out the structure of model documentation, segmented into various sections and sub-sections. Documentation templates define the structure of your model documentation, specifying the tests that should be run, and how the results should be displayed.
Tests: A function contained in the ValidMind Library, designed to run a specific quantitative test on the dataset or model. Tests are the building blocks of ValidMind, used to evaluate and document models and datasets, and can be run individually or as part of a suite defined by your model documentation template.
Custom tests: Custom tests are functions that you define to evaluate your model or dataset. These functions can be registered via the ValidMind Library to be used with the ValidMind Platform.
Inputs: Objects to be evaluated and documented in the ValidMind Library. They can be any of the following:
- model: A single model that has been initialized in ValidMind with
vm.init_model(). - dataset: Single dataset that has been initialized in ValidMind with
vm.init_dataset(). - models: A list of ValidMind models - usually this is used when you want to compare multiple models in your custom test.
- datasets: A list of ValidMind datasets - usually this is used when you want to compare multiple datasets in your custom test. See this example for more information.
Parameters: Additional arguments that can be passed when running a ValidMind test, used to pass additional information to a test, customize its behavior, or provide additional context.
Outputs: Custom tests can return elements like tables or plots. Tables may be a list of dictionaries (each representing a row) or a pandas DataFrame. Plots may be matplotlib or plotly figures.
Test suites: Collections of tests designed to run together to automate and generate model documentation end-to-end for specific use-cases.
Example: the classifier_full_suite test suite runs tests from the tabular_dataset and classifier test suites to fully document the data and model sections for binary classification model use-cases.
1. Initializing the ValidMind Library
Install the ValidMind Library
Please note the following recommended Python versions to use:
- Python 3.8 <= x <= 3.11
To install the library:
Initialize the ValidMind Library
ValidMind generates a unique code snippet for each registered model to connect with your developer environment. You initialize the ValidMind Library with this code snippet, which ensures that your documentation and tests are uploaded to the correct model when you run the notebook.
Get your code snippet
In a browser, log in to ValidMind.
In the left sidebar, navigate to Model Inventory and click + Register Model.
Enter the model details and click Continue. (Need more help?)
For example, to register a model for use with this notebook, select:
- Documentation template:
Binary classification - Use case:
Marketing/Sales - Attrition/Churn Management
You can fill in other options according to your preference.
- Documentation template:
Go to Getting Started and click Copy snippet to clipboard.
Next, load your model identifier credentials from an .env file or replace the placeholder with your own code snippet:
# Load your model identifier credentials from an `.env` file

%load_ext dotenv
%dotenv .env

# Or replace with your code snippet

import validmind as vm

vm.init(
    # api_host="...",
    # api_key="...",
    # api_secret="...",
    # model="...",
)
Verify & preview the documentation template
Let’s verify that you have connected to ValidMind and that the appropriate template is selected. A template predefines sections for your model documentation and provides a general outline to follow, making the documentation process much easier.
You will upload documentation and test results for this template later on. For now, take a look at the structure that the template provides with the vm.preview_template() function from the ValidMind library and note the empty sections:
vm.preview_template()Before learning how to run tests, let’s explore the list of all available tests in the ValidMind Library. You can see that the documentation template for this model has references to some of the test IDs listed below.
vm.tests.list_tests()2. Start the model development process with raw data, run out-of-the box tests, and add evidence to model documentation
In this section you learn how to explore the individual tests available in ValidMind and how to run them and change parameters as necessary. You will use a public dataset from Kaggle that models a bank customer churn prediction use case. The target column, Exited has a value of 1 when a customer has churned and 0 otherwise.
You can find more information about this dataset here.
The ValidMind Library provides a wrapper to automatically load the dataset as a Pandas DataFrame object.
from validmind.datasets.classification import customer_churn as demo_dataset

print(
    f"Loaded demo dataset with: \n\n\t• Target column: '{demo_dataset.target_column}' \n\t• Class labels: {demo_dataset.class_labels}"
)

raw_df = demo_dataset.load_data()
raw_df.head()
Let’s do some data quality assessments by running a few individual tests related to data assessment. You will use the vm.tests.list_tests() function introduced above in combination with vm.tests.list_tags() and vm.tests.list_tasks() to find which prebuilt tests are relevant for data quality assessment.
# Get the list of available tags
sorted(vm.tests.list_tags())
# Get the list of available task types
sorted(vm.tests.list_tasks())You can pass tags and tasks as parameters to the vm.tests.list_tests() function to filter the tests based on the tags and task types. For example, to find tests related to tabular data quality for classification models, you can call list_tests() like this:
vm.tests.list_tests(task="classification", tags=["tabular_data", "data_quality"])Initialize the ValidMind datasets
Now, assume we have identified some tests we want to run with regards to the data we are intending to use. The next step is to connect your data with a ValidMind Dataset object. This step is always necessary every time you want to connect a dataset to documentation and produce test results through ValidMind. You only need to do it one time per dataset.
You can initialize a ValidMind dataset object using the init_dataset function from the ValidMind (vm) module.
This function takes a number of arguments:
dataset— the raw dataset that you want to provide as input to testsinput_id- a unique identifier that allows tracking what inputs are used when running each individual testtarget_column— a required argument if tests require access to true values. This is the name of the target column in the dataset
# vm_raw_dataset is now a VMDataset object that you can pass to any ValidMind test
vm_raw_dataset = vm.init_dataset(
    dataset=raw_df,
    input_id="raw_dataset",
    target_column="Exited",
)
Run some tabular data tests
Individual tests can be easily run by calling the run_test function provided by the validmind.tests module. The function takes the following arguments:
test_id: The ID of the test to run. To find a particular test and get its ID, refer to the explore_tests notebook. Look above for example after running ‘vm.test_suites.describe_suite’ as column ‘Test ID’ will contain the id.params: A dictionary of parameters for the test. These will override anydefault_paramsset in the test definition. Refer to the explore_tests notebook to find the default parameters for a test. See below for examples.
The inputs expected by a test can also be found in the test definition. Let’s take validmind.data_validation.DescriptiveStatistics as an example. Note that the output of the describe_test() function below shows that this test expects a dataset as input:
vm.tests.describe_test("validmind.data_validation.DescriptiveStatistics")Now, let’s run a few tests to assess the quality of the dataset.
result = vm.tests.run_test(
    test_id="validmind.data_validation.DescriptiveStatistics",
    inputs={"dataset": vm_raw_dataset},
)
result2 = vm.tests.run_test(
test_id="validmind.data_validation.ClassImbalance",
inputs={"dataset": vm_raw_dataset},
params={"min_percent_threshold": 30},
)You can see that the class imbalance test did not pass according to the value of min_percent_threshold we have set. Here is how you can re-run the test on some processed data to address this data quality issue. In this case we apply a very simple rebalancing technique to the dataset.
import pandas as pd

raw_copy_df = raw_df.sample(frac=1)  # Create a copy of the raw dataset

# Create a balanced dataset with the same number of exited and not exited customers
exited_df = raw_copy_df.loc[raw_copy_df["Exited"] == 1]
not_exited_df = raw_copy_df.loc[raw_copy_df["Exited"] == 0].sample(n=exited_df.shape[0])

balanced_raw_df = pd.concat([exited_df, not_exited_df])
balanced_raw_df = balanced_raw_df.sample(frac=1, random_state=42)
With this new raw dataset, you can re-run the individual test to see if it passes the class imbalance test requirement. Remember to register new VM Dataset object since that is the type of input required by run_test():
# Register new data and now 'balanced_raw_dataset' is the new dataset object of interest
vm_balanced_raw_dataset = vm.init_dataset(
    dataset=balanced_raw_df,
    input_id="balanced_raw_dataset",
    target_column="Exited",
)
result = vm.tests.run_test(
test_id="validmind.data_validation.ClassImbalance",
inputs={"dataset": vm_balanced_raw_dataset},
params={"min_percent_threshold": 30},
)Utilize test output
Here is an example for how you can utilize the output from a ValidMind test for futher use, for example, if you want to remove highly correlated features. The example below shows how you can get the list of features with the highest correlation coefficients and use them to reduce the final list of features for modeling.
corr_result = vm.tests.run_test(
    test_id="validmind.data_validation.HighPearsonCorrelation",
    params={"max_threshold": 0.3},
    inputs={"dataset": vm_balanced_raw_dataset},
)
Let’s assume we want to remove highly correlated features from the dataset. corr_result is an object of type TestResult. We can inspect the result object to see what the test has produced.
print(type(corr_result))
print("Result ID: ", corr_result.result_id)
print("Params: ", corr_result.params)
print("Passed: ", corr_result.passed)
print("Tables: ", corr_result.tables)
Let’s check out the table in the result and extract a list of features that failed the test:
features_df = corr_result.tables[0].data
features_df
Remove the highly correlated features and create a new VM dataset object. Note the use of different input_ids. This allows tracking the inputs used when running each individual test.
high_correlation_features = features_df[features_df["Pass/Fail"] == "Fail"]["Columns"].tolist()
high_correlation_features
Extract the feature names from the list of strings (e.g. ‘(Age, Exited)’ -> ‘Age’)
high_correlation_features = [feature.split(",")[0].strip("()") for feature in high_correlation_features]
high_correlation_features
# Remove the highly correlated features from the dataset
balanced_raw_no_age_df = balanced_raw_df.drop(columns=high_correlation_features)
# Re-initialize the dataset object
vm_raw_dataset_preprocessed = vm.init_dataset(
dataset=balanced_raw_no_age_df,
input_id="raw_dataset_preprocessed",
target_column="Exited",
)Re-running the test with the reduced feature set should pass the test. You can also plot the correlation matrix to visualize the new correlation between features:
corr_result = vm.tests.run_test(
    test_id="validmind.data_validation.HighPearsonCorrelation",
    params={"max_threshold": 0.3},
    inputs={"dataset": vm_raw_dataset_preprocessed},
)
corr_result = vm.tests.run_test(
test_id="validmind.data_validation.PearsonCorrelationMatrix",
inputs={"dataset": vm_raw_dataset_preprocessed},
)Documenting the results based on two datasets
We have now done some analysis on two different datasets and we should able to document why certain things were done to the raw data with testing to support it. Every test result returned by the run_test() function has a .log() method that can be used to log the test results to ValidMind. When logging individual results to ValidMind you need to manually add those results in a specific section of the model documentation.
When using run_documentation_tests(), it’s possible to automatically populate a section with the results of all tests that were registered in the documentation template.
To show how to add individual results to any documentation section, we’re going to populate the entire data_preparation section of the documentation using the clean vm_raw_dataset_preprocessed dataset as input, and then we’re going to document an additional result for the highly correlated dataset vm_balanced_raw_dataset. The following two steps will accomplish this:
- Run
run_documentation_tests()usingvm_raw_dataset_preprocessedas input. This populates the entire data preparation section for every test that is already part of the documentation template. - Log the individual result of the high correlation test that used
vm_balanced_raw_dataset(that had a highly correlatedAgecolumn) as input
After adding the result of step #2 to the documentation you will be able to explain the changes made to the raw data by editing the default description of the test result within the ValidMind Platform.
Run run_documentation_tests() using vm_raw_dataset_preprocessed as input
run_documentation_tests() allows you to run multiple tests at once and log the results to the documentation. The function takes the following arguments:
inputs: any inputs to be passed to the testsconfig: a dictionary<test_id>:<test_config>that allows configuring each test individually. Each test config has the following form:params: individual test parametersinputs: individual test inputs. When passed, this overrides any inputs passed from therun_documentation_tests()function
test_config = {
    "validmind.data_validation.ClassImbalance": {
        "params": {"min_percent_threshold": 30},
    },
    "validmind.data_validation.HighPearsonCorrelation": {
        "params": {"max_threshold": 0.3},
    },
}

tests_suite = vm.run_documentation_tests(
    inputs={
        "dataset": vm_raw_dataset_preprocessed,
    },
    config=test_config,
    section=["data_preparation"],
)Add individual test results to model documentation
You can now visit the documentation page for the model you connected to at the beginning of this notebook and add a new content block in the relevant section.
To do this, go to the documentation page of your model and navigate to the Data Preparation -> Correlations and Interactions section. Then hover after the “Pearson Correlation Matrix” content block to reveal the + button as shown in the screenshot below.

Click on the + button and select Test-Driven Block. This will open a dialog where you can select Threshold Test as the type of the test-driven content block, and then select High Pearson Correlation Vm Raw Dataset Test. This will show a preview of the result and it should match the results shown above.
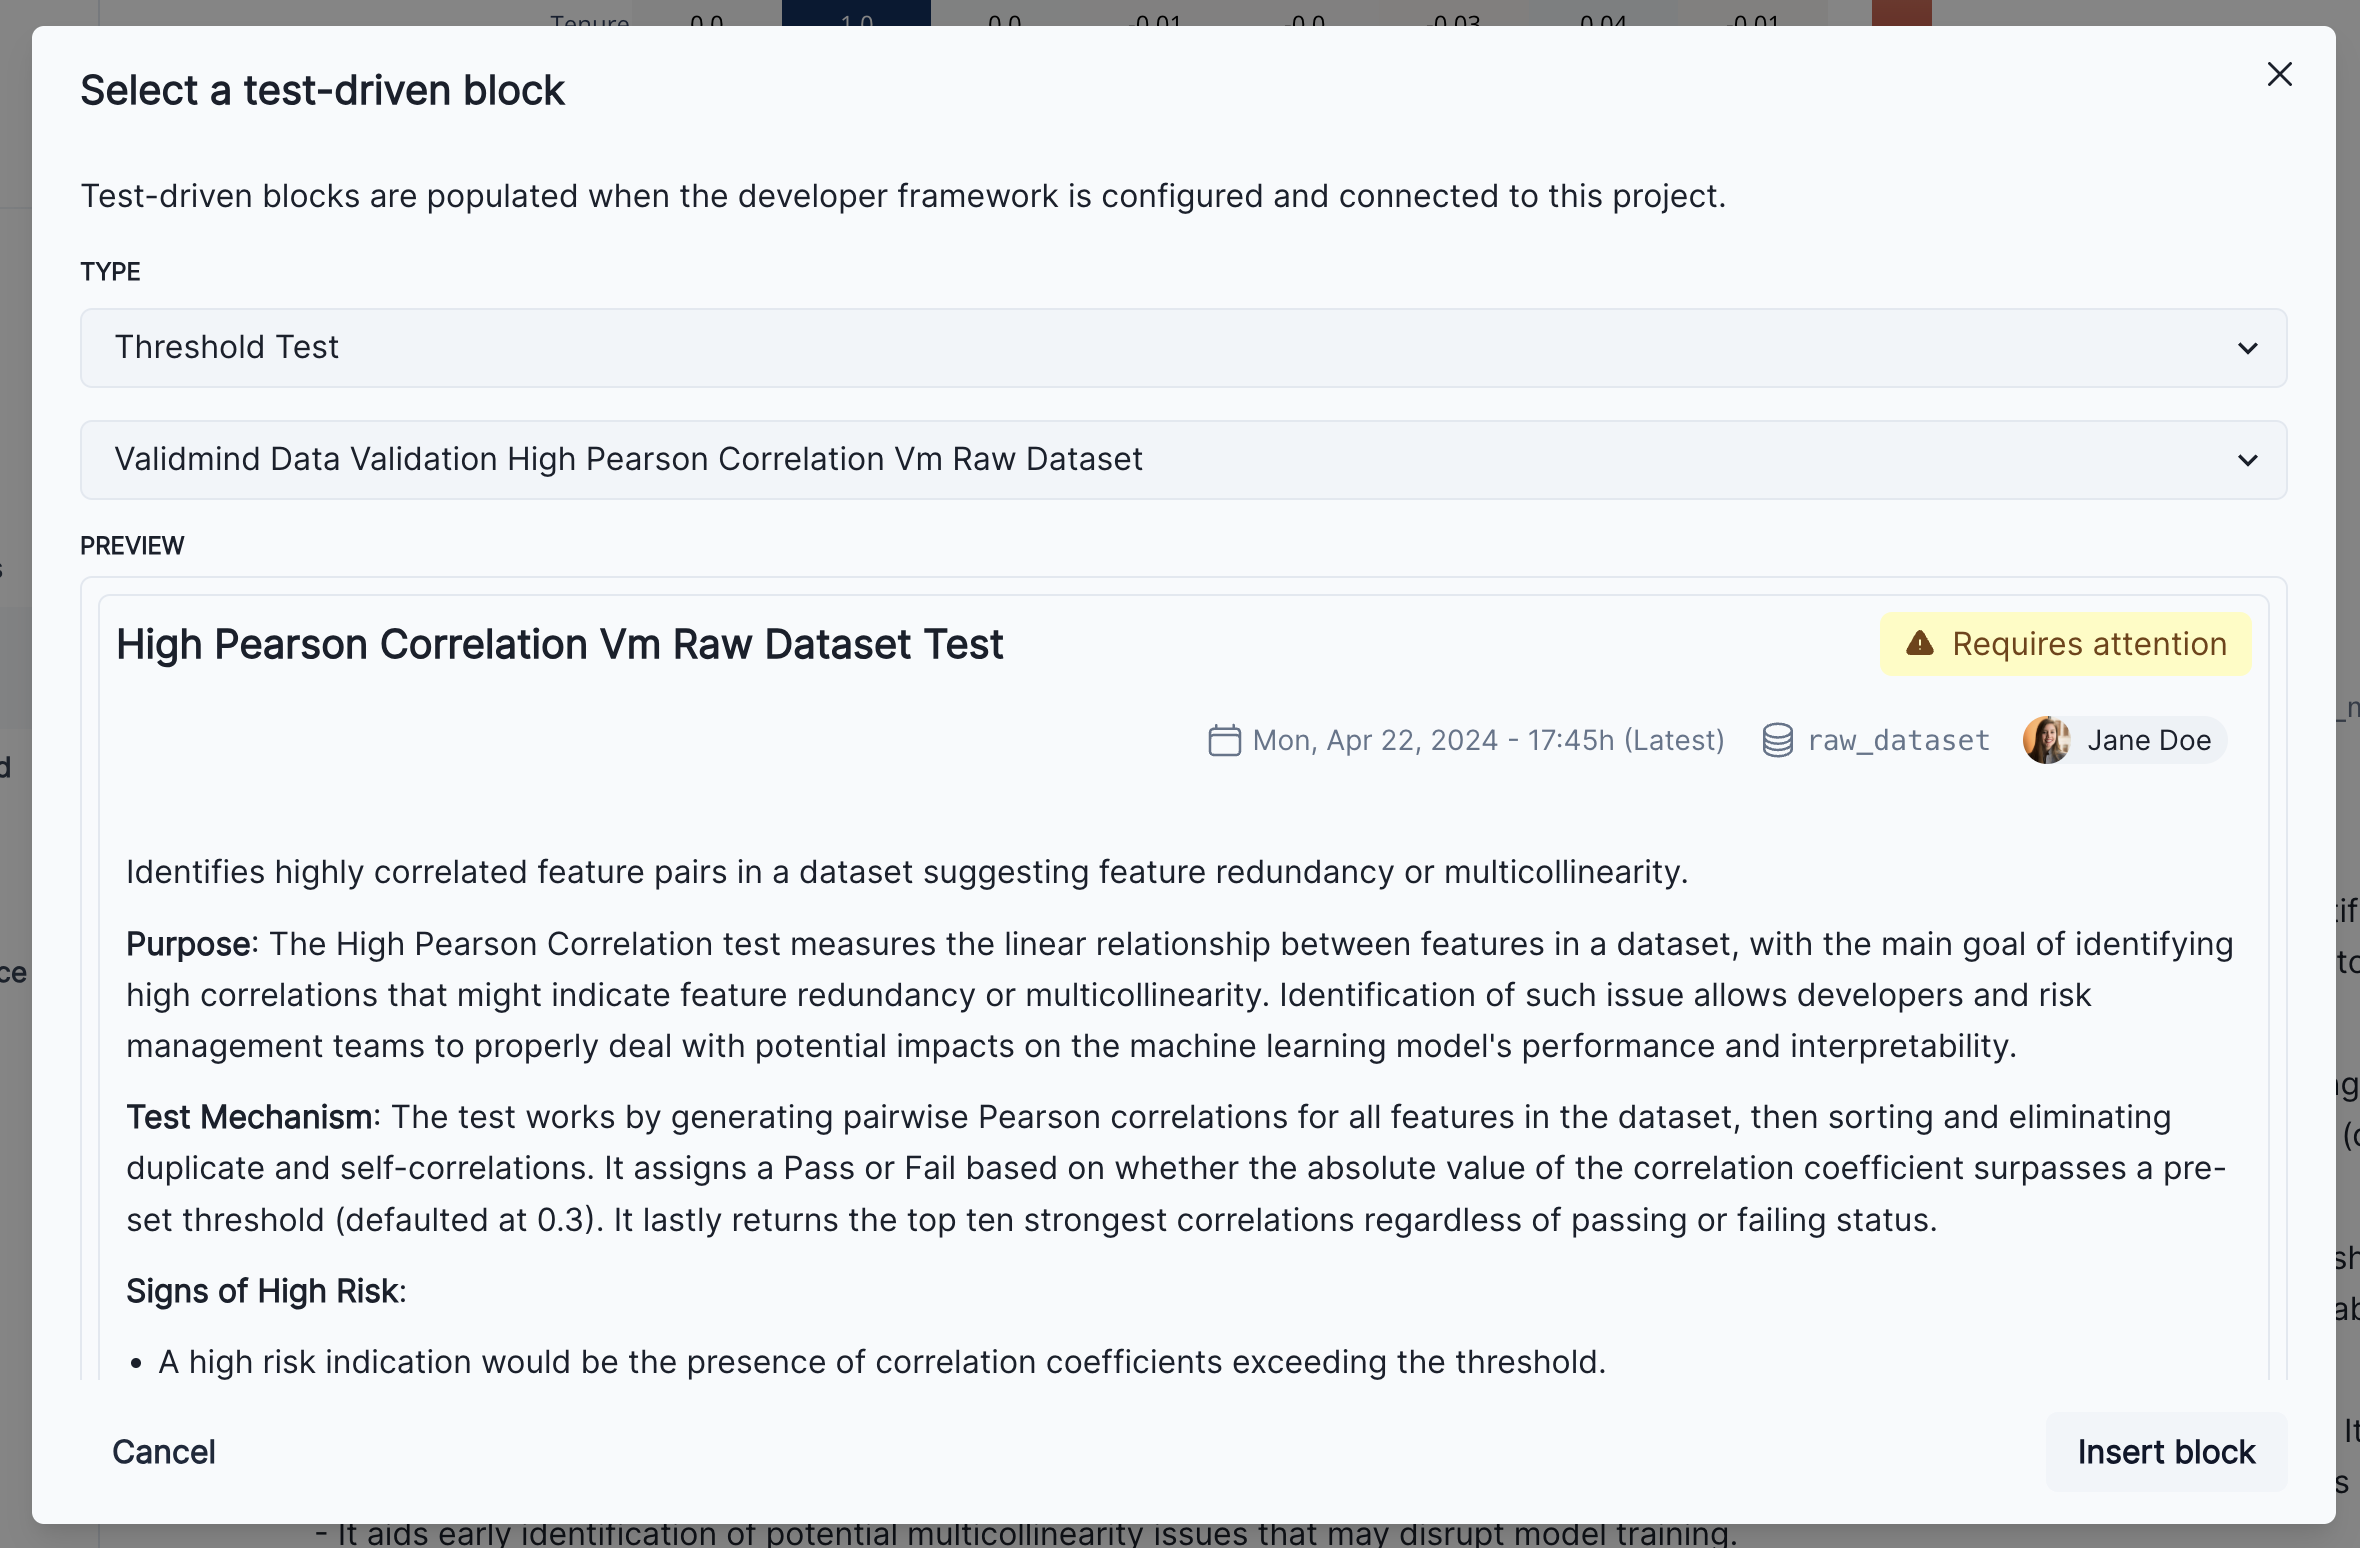
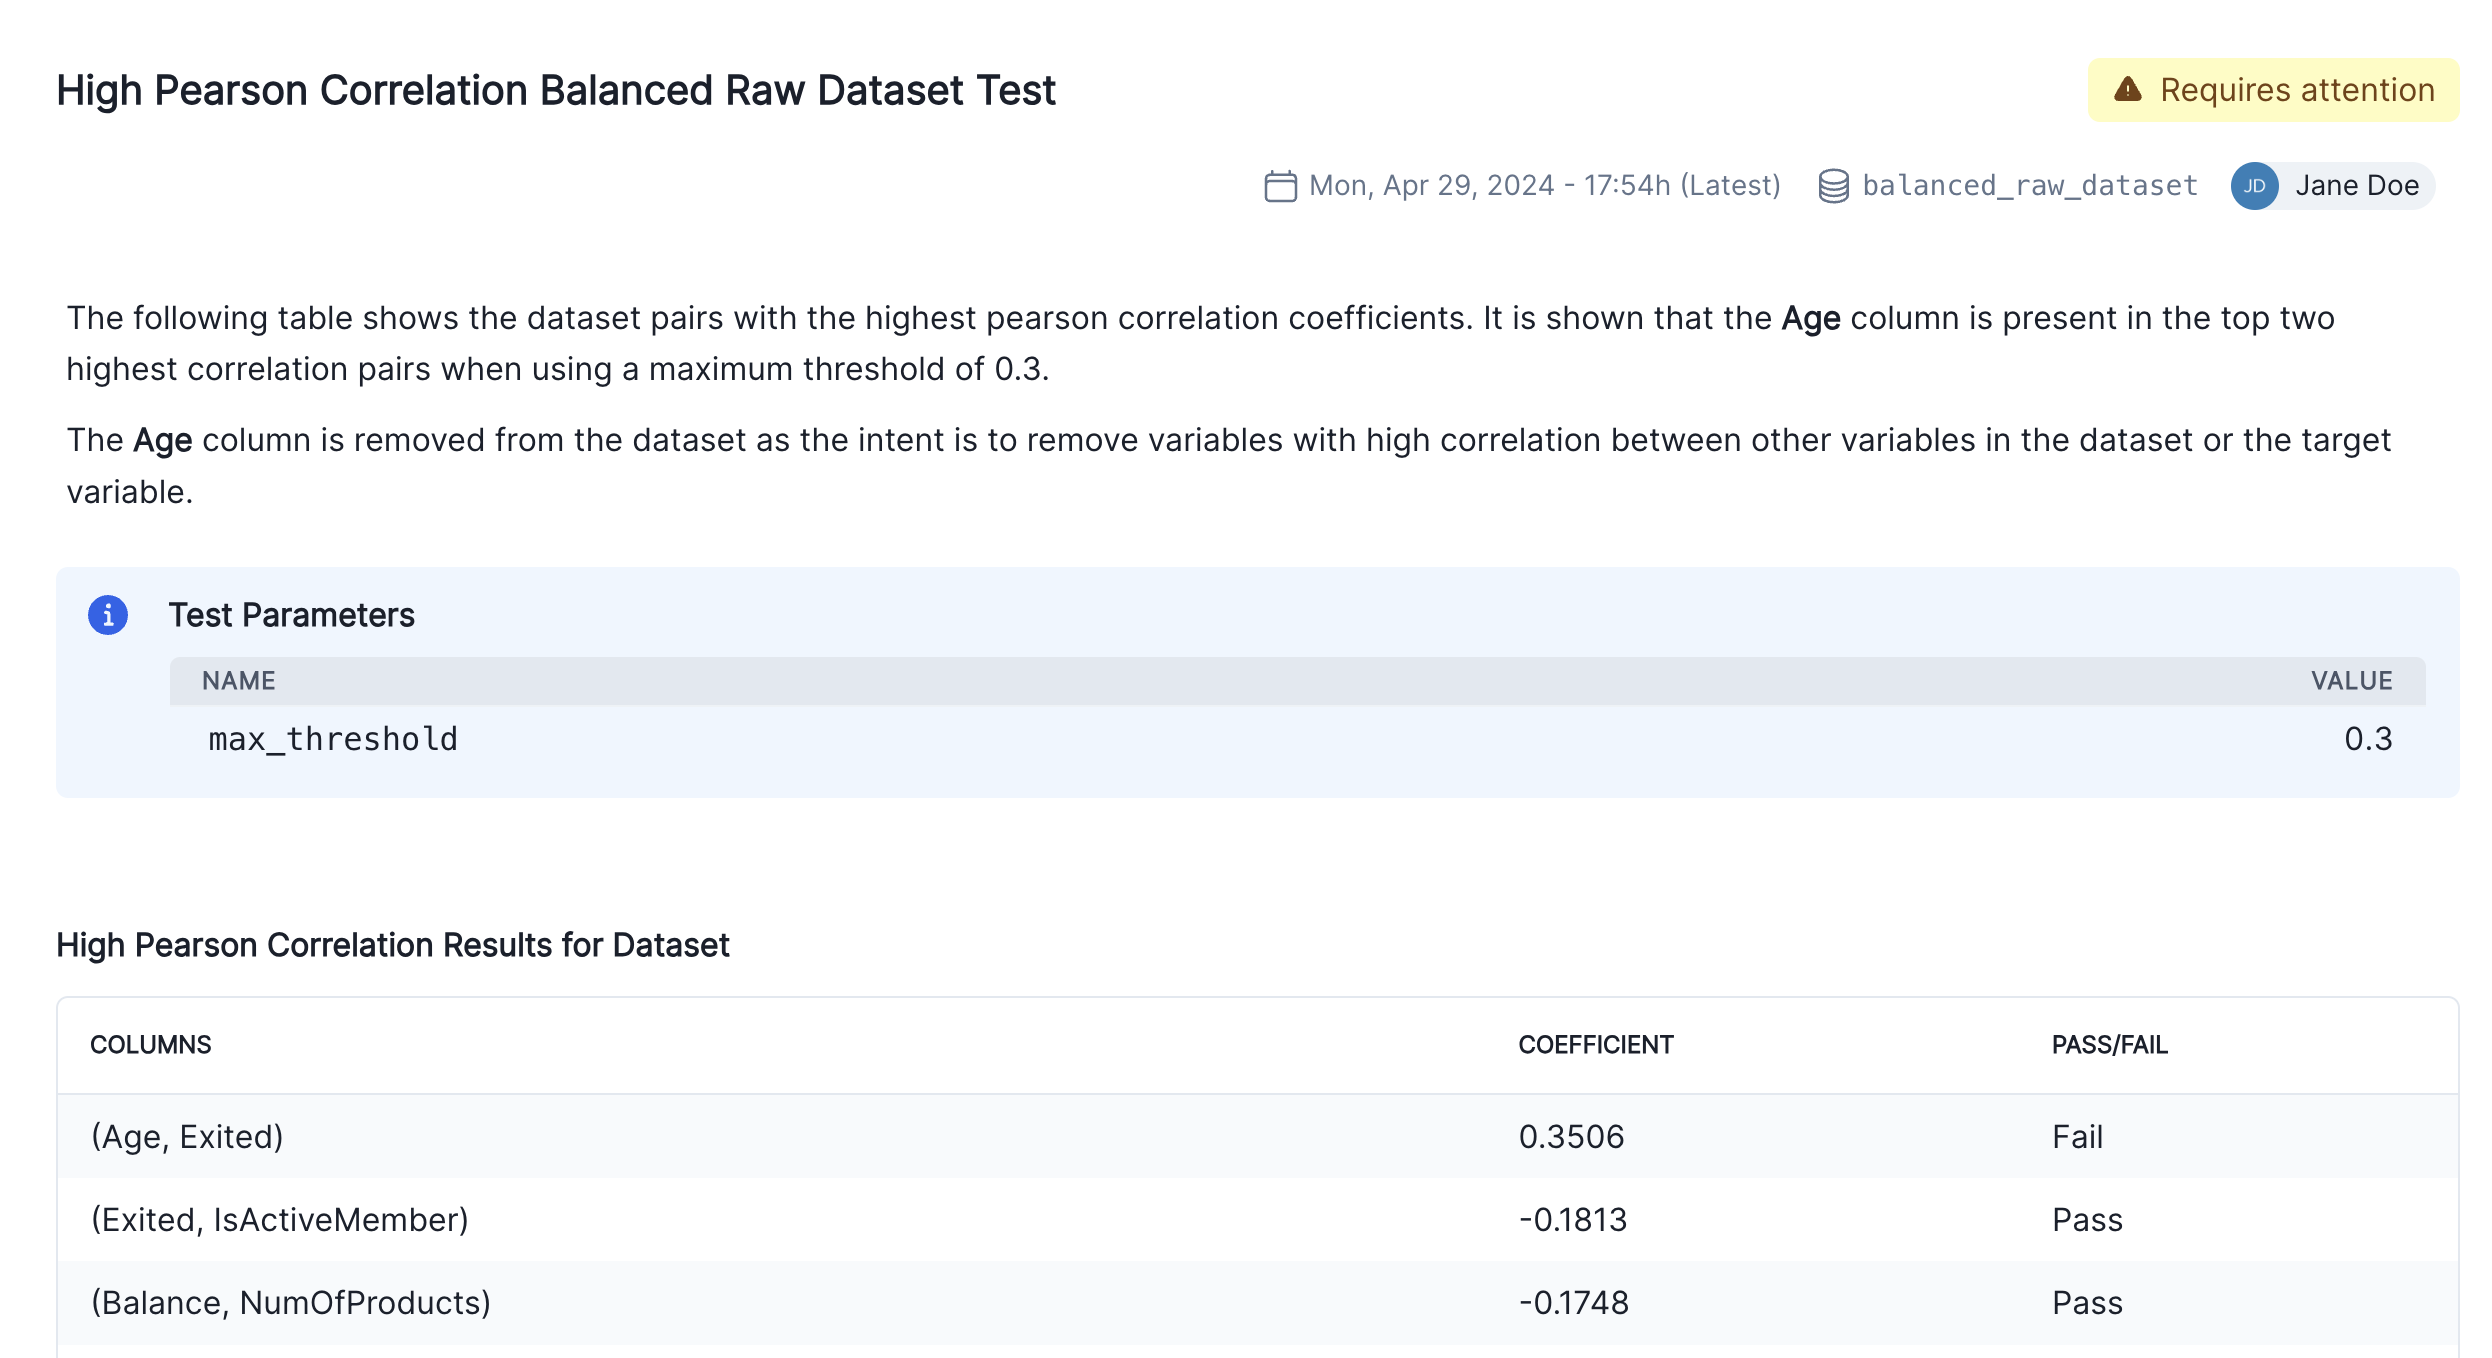
Finally, click on the Insert block button to add the test result to the documentation. You’ll now see two individual results for the high correlation test in the Correlations and Interactions section of the documentation. To finalize the documentation, you can edit the test result’s description block to explain the changes made to the raw data and the reasons behind them as we can see in the screenshot below.
Model Testing
We have focused so far on the data assessment and pre-processing that usually occurs prior to any models being built. Now we are going to assume we have built a model and we want to incorporate some model results in our documentation.
Let’s train a simple logistic regression model on the dataset and evaluate its performance. You will use the LogisticRegression class from the sklearn.linear_model and use ValidMind tests to evaluate the model’s performance.
Before training the model, we need to encode the categorical features in the dataset. You will use the OneHotEncoder class from the sklearn.preprocessing module to encode the categorical features. The categorical features in the dataset are Geography and Gender.
balanced_raw_no_age_df.head()balanced_raw_no_age_df = pd.get_dummies(
balanced_raw_no_age_df, columns=["Geography", "Gender"], drop_first=True
)
balanced_raw_no_age_df.head()from sklearn.linear_model import LogisticRegression
from sklearn.model_selection import train_test_split
# Split the input and target variables
X = balanced_raw_no_age_df.drop("Exited", axis=1)
y = balanced_raw_no_age_df["Exited"]
X_train, X_test, y_train, y_test = train_test_split(
X,
y,
test_size=0.2,
random_state=42,
)
# Logistic Regression grid params
log_reg_params = {
"penalty": ["l1", "l2"],
"C": [0.001, 0.01, 0.1, 1, 10, 100, 1000],
"solver": ["liblinear"],
}
# Grid search for Logistic Regression
from sklearn.model_selection import GridSearchCV
grid_log_reg = GridSearchCV(LogisticRegression(), log_reg_params)
grid_log_reg.fit(X_train, y_train)
# Logistic Regression best estimator
log_reg = grid_log_reg.best_estimator_Initialize model evaluation objects and assigning predictions
The last step for evaluating the model’s performance is to initialize the ValidMind Dataset and Model objects and assign model predictions to each dataset. You will use the init_dataset, init_model and assign_predictions functions to initialize these objects.
train_df = X_train
train_df["Exited"] = y_train
test_df = X_test
test_df["Exited"] = y_test

vm_train_ds = vm.init_dataset(
    input_id="train_dataset_final",
    dataset=train_df,
    target_column="Exited",
)

vm_test_ds = vm.init_dataset(
    input_id="test_dataset_final",
    dataset=test_df,
    target_column="Exited",
)

# Register the model
vm_model = vm.init_model(log_reg, input_id="log_reg_model_v1")
Once the model has been registered you can assign model predictions to the training and test datasets. The assign_predictions() method from the Dataset object can link existing predictions to any number of models. If no prediction values are passed, the method will compute predictions automatically:
vm_train_ds.assign_predictions(model=vm_model)
vm_test_ds.assign_predictions(model=vm_model)
Run the model evaluation tests
In this part, we focus on running the tests within the model development section of the model documentation. Only tests associated with this section will be executed, and the corresponding results will be updated in the model documentation. In the example below, you will focus on only running tests for the model development section of the document.
Note the additional config that is passed to run_documentation_tests(). This allows you to override inputs or params in certain tests. In our case, we want to explicitly use the vm_train_ds for the validmind.model_validation.sklearn.ClassifierPerformance:in_sample test, since it’s supposed to run on the training dataset and not the test dataset.
test_config = {
    "validmind.model_validation.sklearn.ClassifierPerformance:in_sample": {
        "inputs": {
            "dataset": vm_train_ds,
            "model": vm_model,
        },
    }
}
results = vm.run_documentation_tests(
    section=["model_development"],
    inputs={
        "dataset": vm_test_ds,  # Any test that requires a single dataset will use vm_test_ds
        "model": vm_model,
        "datasets": (
            vm_train_ds,
            vm_test_ds,
        ),  # Any test that requires multiple datasets will use vm_train_ds and vm_test_ds
    },
    config=test_config,
)
3. Implementing custom tests
This section assumes that model developers already have a repository of custom made tests that they consider critical to include in the documentation. Here we provide details on how to easily integrate custom tests with ValidMind.
For a more in-depth introduction to custom tests, refer to this notebook.
A custom test is any function that takes a set of inputs and parameters as arguments and returns one or more outputs. The function can be as simple or as complex as you need it to be. It can use external libraries, make API calls, or do anything else that you can do in Python. The only requirement is that the function signature and return values can be “understood” and handled by the ValidMind Library. As such, custom tests offer added flexibility by extending the default tests provided by ValidMind, enabling you to document any type of model or use case.
In the following example, you will learn how to implement a custom inline test that calculates the confusion matrix for a binary classification model. You will see that the custom test function is just a regular Python function that can include and require any Python library as you see fit.
NOTE: in the context of Jupyter notebooks, we will use the word inline to refer to functions (or code) defined in the same notebook where they are used (this one) and not in a separate file, as we will see later with test providers.
Create a confusion matrix plot
To understand how to create a custom test from anything, let’s first create a confusion matrix plot using the confusion_matrix function from the sklearn.metrics module.
import matplotlib.pyplot as plt
from sklearn import metrics

# Get the predicted classes
y_pred = log_reg.predict(vm_test_ds.x)

confusion_matrix = metrics.confusion_matrix(y_test, y_pred)

cm_display = metrics.ConfusionMatrixDisplay(
    confusion_matrix=confusion_matrix, display_labels=[False, True]
)
cm_display.plot()
We will now create a @vm.test wrapper that will allow you to create a reusable test. Note the following changes in the code below:
- The function
confusion_matrixtakes two argumentsdatasetandmodel. This is aVMDatasetandVMModelobject respectively.VMDatasetobjects allow you to access the dataset’s true (target) values by accessing the.yattribute.VMDatasetobjects allow you to access the predictions for a given model by accessing the.y_pred()method.
- The function docstring provides a description of what the test does. This will be displayed along with the result in this notebook as well as in the ValidMind Platform.
- The function body calculates the confusion matrix using the
sklearn.metrics.confusion_matrixfunction as we just did above. - The function then returns the
ConfusionMatrixDisplay.figure_object - this is important as the ValidMind Library expects the output of the custom test to be a plot or a table. - The
@vm.testdecorator is doing the work of creating a wrapper around the function that will allow it to be run by the ValidMind Library. It also registers the test so it can be found by the IDmy_custom_tests.ConfusionMatrix(see the section below on how test IDs work in ValidMind and why this format is important)
@vm.test("my_custom_tests.ConfusionMatrix")
def confusion_matrix(dataset, model):
    """The confusion matrix is a table that is often used to describe the performance of a classification model on a set of data for which the true values are known.

    The confusion matrix is a 2x2 table that contains 4 values:

    - True Positive (TP): the number of correct positive predictions
    - True Negative (TN): the number of correct negative predictions
    - False Positive (FP): the number of incorrect positive predictions
    - False Negative (FN): the number of incorrect negative predictions

    The confusion matrix can be used to assess the holistic performance of a classification model by showing the accuracy, precision, recall, and F1 score of the model on a single figure.
    """
    y_true = dataset.y
    y_pred = dataset.y_pred(model=model)

    confusion_matrix = metrics.confusion_matrix(y_true, y_pred)

    cm_display = metrics.ConfusionMatrixDisplay(
        confusion_matrix=confusion_matrix, display_labels=[False, True]
    )
    cm_display.plot()

    plt.close()  # close the plot to avoid displaying it

    return cm_display.figure_  # return the figure object itself
You can now run the newly created custom test on both the training and test datasets using the run_test() function:
# Training dataset
result = vm.tests.run_test(
    "my_custom_tests.ConfusionMatrix:training_dataset",
    inputs={"model": vm_model, "dataset": vm_train_ds},
)
# Test dataset
result = vm.tests.run_test(
"my_custom_tests.ConfusionMatrix:test_dataset",
inputs={"model": vm_model, "dataset": vm_test_ds},
)Add parameters to custom tests
Custom tests can take parameters just like any other function. Let’s modify the confusion_matrix function to take an additional parameter normalize that will allow you to normalize the confusion matrix.
@vm.test("my_custom_tests.ConfusionMatrix")
def confusion_matrix(dataset, model, normalize=False):
    """The confusion matrix is a table that is often used to describe the performance of a classification model on a set of data for which the true values are known.

    The confusion matrix is a 2x2 table that contains 4 values:

    - True Positive (TP): the number of correct positive predictions
    - True Negative (TN): the number of correct negative predictions
    - False Positive (FP): the number of incorrect positive predictions
    - False Negative (FN): the number of incorrect negative predictions

    The confusion matrix can be used to assess the holistic performance of a classification model by showing the accuracy, precision, recall, and F1 score of the model on a single figure.
    """
    y_true = dataset.y
    y_pred = dataset.y_pred(model=model)

    if normalize:
        confusion_matrix = metrics.confusion_matrix(y_true, y_pred, normalize="all")
    else:
        confusion_matrix = metrics.confusion_matrix(y_true, y_pred)

    cm_display = metrics.ConfusionMatrixDisplay(
        confusion_matrix=confusion_matrix, display_labels=[False, True]
    )
    cm_display.plot()

    plt.close()  # close the plot to avoid displaying it

    return cm_display.figure_  # return the figure object itself
Pass parameters to custom tests
You can pass parameters to custom tests by providing a dictionary of parameters to the run_test() function. The parameters will override any default parameters set in the custom test definition. Note that dataset and model are still passed as inputs. Since these are VMDataset or VMModel inputs, they have a special meaning. When declaring a dataset, model, datasets or models argument in a custom test function, the ValidMind Library will expect these get passed as inputs to run_test() (or run_documentation_tests() instead).
Re-running the confusion matrix with normalize=True looks like this:
# Test dataset with normalize=True
result = vm.tests.run_test(
    "my_custom_tests.ConfusionMatrix:test_dataset_normalized",
    inputs={"model": vm_model, "dataset": vm_test_ds},
    params={"normalize": True},
)
Log the confusion matrix results
As you saw in the pearson correlation example, you can log any result to the ValidMind Platform with the .log() method of the result object. This will allow you to add the result to the documentation.
You can now do the same for the confusion matrix results.
result.log()Using external test providers
Creating inline custom tests with a function is a great way to customize your model documentation. However, sometimes you may want to reuse the same set of tests across multiple models and share them with developers in your organization. In this case, you can create a custom test provider that will allow you to load custom tests from a local folder or a git repository.
In this section you will learn how to declare a local filesystem test provider that allows loading tests from a local folder following these high level steps:
- Create a folder of custom tests from existing, inline tests (tests that exists in your active Jupyter notebook)
- Save an inline test to a file
- Define and register a
LocalTestProviderthat points to that folder - Run test provider tests
- Add the test results to your documentation
Create a folder of custom tests from existing inline tests
Here you will create a new folder that will contain reusable, custom tests. The following code snippet will create a new my_tests directory in the current working directory if it doesn’t exist.
tests_folder = "my_tests"
import os
# create tests folder
os.makedirs(tests_folder, exist_ok=True)
# remove existing tests
for f in os.listdir(tests_folder):
# remove files and pycache
if f.endswith(".py") or f == "__pycache__":
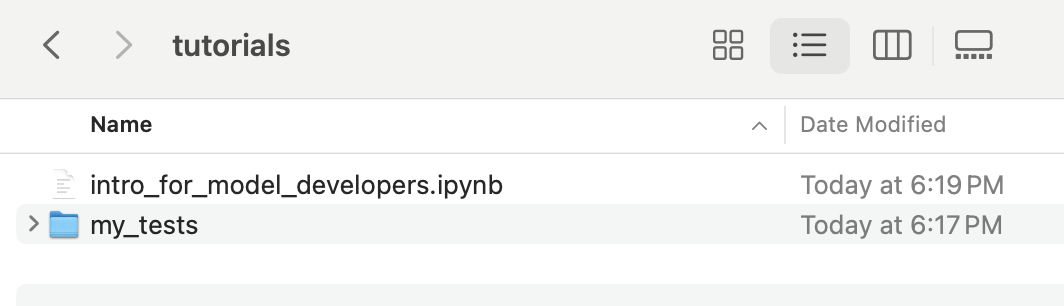
os.system(f"rm -rf {tests_folder}/{f}")After running the command above, you should see a new directory next to this notebook file:
Save an inline test to a file
The @vm.test decorator that was used above to register these as one-off custom tests also adds a convenience method to the function object that allows you to simply call <func_name>.save() to save it to a file. This will save the function to a Python file to a path you specify. In this case, you can pass the variable tests_folder to save it to the custom tests folder we created.
Normally, this will get you started by creating the file and saving the function code with the correct name. But it won’t automatically add any import or other functions/variables outside of the function that are needed for the test to run. The save() method allows you to pass an optional imports argument that will ensure the necessary imports are added to the file.
For the confusion_matrix test, note the imports that are required for the function to run properly:
import matplotlib.pyplot as plt
from sklearn import metrics
You can pass these imports to the save() method to ensure they are included in the file with the following command:
confusion_matrix.save(
    tests_folder,
    imports=["import matplotlib.pyplot as plt", "from sklearn import metrics"],
)
What happened?
The save() method saved the confusion_matrix function to a file named ConfusionMatrix.py in the my_tests folder. Note that the new file provides some context on the origin of the test, which is useful for traceability.
# Saved from __main__.confusion_matrix
# Original Test ID: my_custom_tests.ConfusionMatrix
# New Test ID: <test_provider_namespace>.ConfusionMatrix
Additionally, the new test function has been stripped off its decorator, as it now resides in a file that will be loaded by the test provider:
def ConfusionMatrix(dataset, model, normalize=False):Define and register a LocalTestProvider that points to that folder
With the my_tests folder now having a sample custom test, you can now initialize a test provider that will tell the ValidMind Library where to find these tests. ValidMind offers out-of-the-box test providers for local tests (i.e. tests in a folder) or a Github provider for tests in a Github repository. You can also create your own test provider by creating a class that has a load_test method that takes a test ID and returns the test function matching that ID.
The most important attribute for a test provider is its namespace. This is a string that will be used to prefix test IDs in model documentation. This allows you to have multiple test providers with tests that can even share the same ID, but are distinguished by their namespace.
An extended introduction to test providers can be found in this notebook.
Initializing a local test provider
For most use-cases, the local test provider should be sufficient. This test provider allows you load custom tests from a designated directory. Let’s go ahead and see how we can do this with our custom tests.
from validmind.tests import LocalTestProvider

# initialize the test provider with the tests folder we created earlier
my_test_provider = LocalTestProvider(tests_folder)

vm.tests.register_test_provider(
    namespace="my_test_provider",
    test_provider=my_test_provider,
)
# `my_test_provider.load_test()` will be called for any test ID that starts with `my_test_provider`
# e.g. `my_test_provider.ConfusionMatrix` will look for a function named `ConfusionMatrix` in `my_tests/ConfusionMatrix.py` file
Run test provider tests
Now that you have set up the test provider, you can run any test that’s located in the tests folder by using the run_test() method as with any other test. For tests that reside in a test provider directory, the test ID will be the namespace specified when registering the provider, followed by the path to the test file relative to the tests folder. For example, the Confusion Matrix test we created earlier will have the test ID my_test_provider.ConfusionMatrix. You could organize the tests in subfolders, say classification and regression, and the test ID for the Confusion Matrix test would then be my_test_provider.classification.ConfusionMatrix.
Let’s go ahead and re-run the confusion matrix test by using the test ID my_test_provider.ConfusionMatrix. This should load the test from the test provider and run it as before.
result = vm.tests.run_test(
    "my_test_provider.ConfusionMatrix",
    inputs={"model": vm_model, "dataset": vm_test_ds},
    params={"normalize": True},
)

result.log()
Add the test results to your documentation
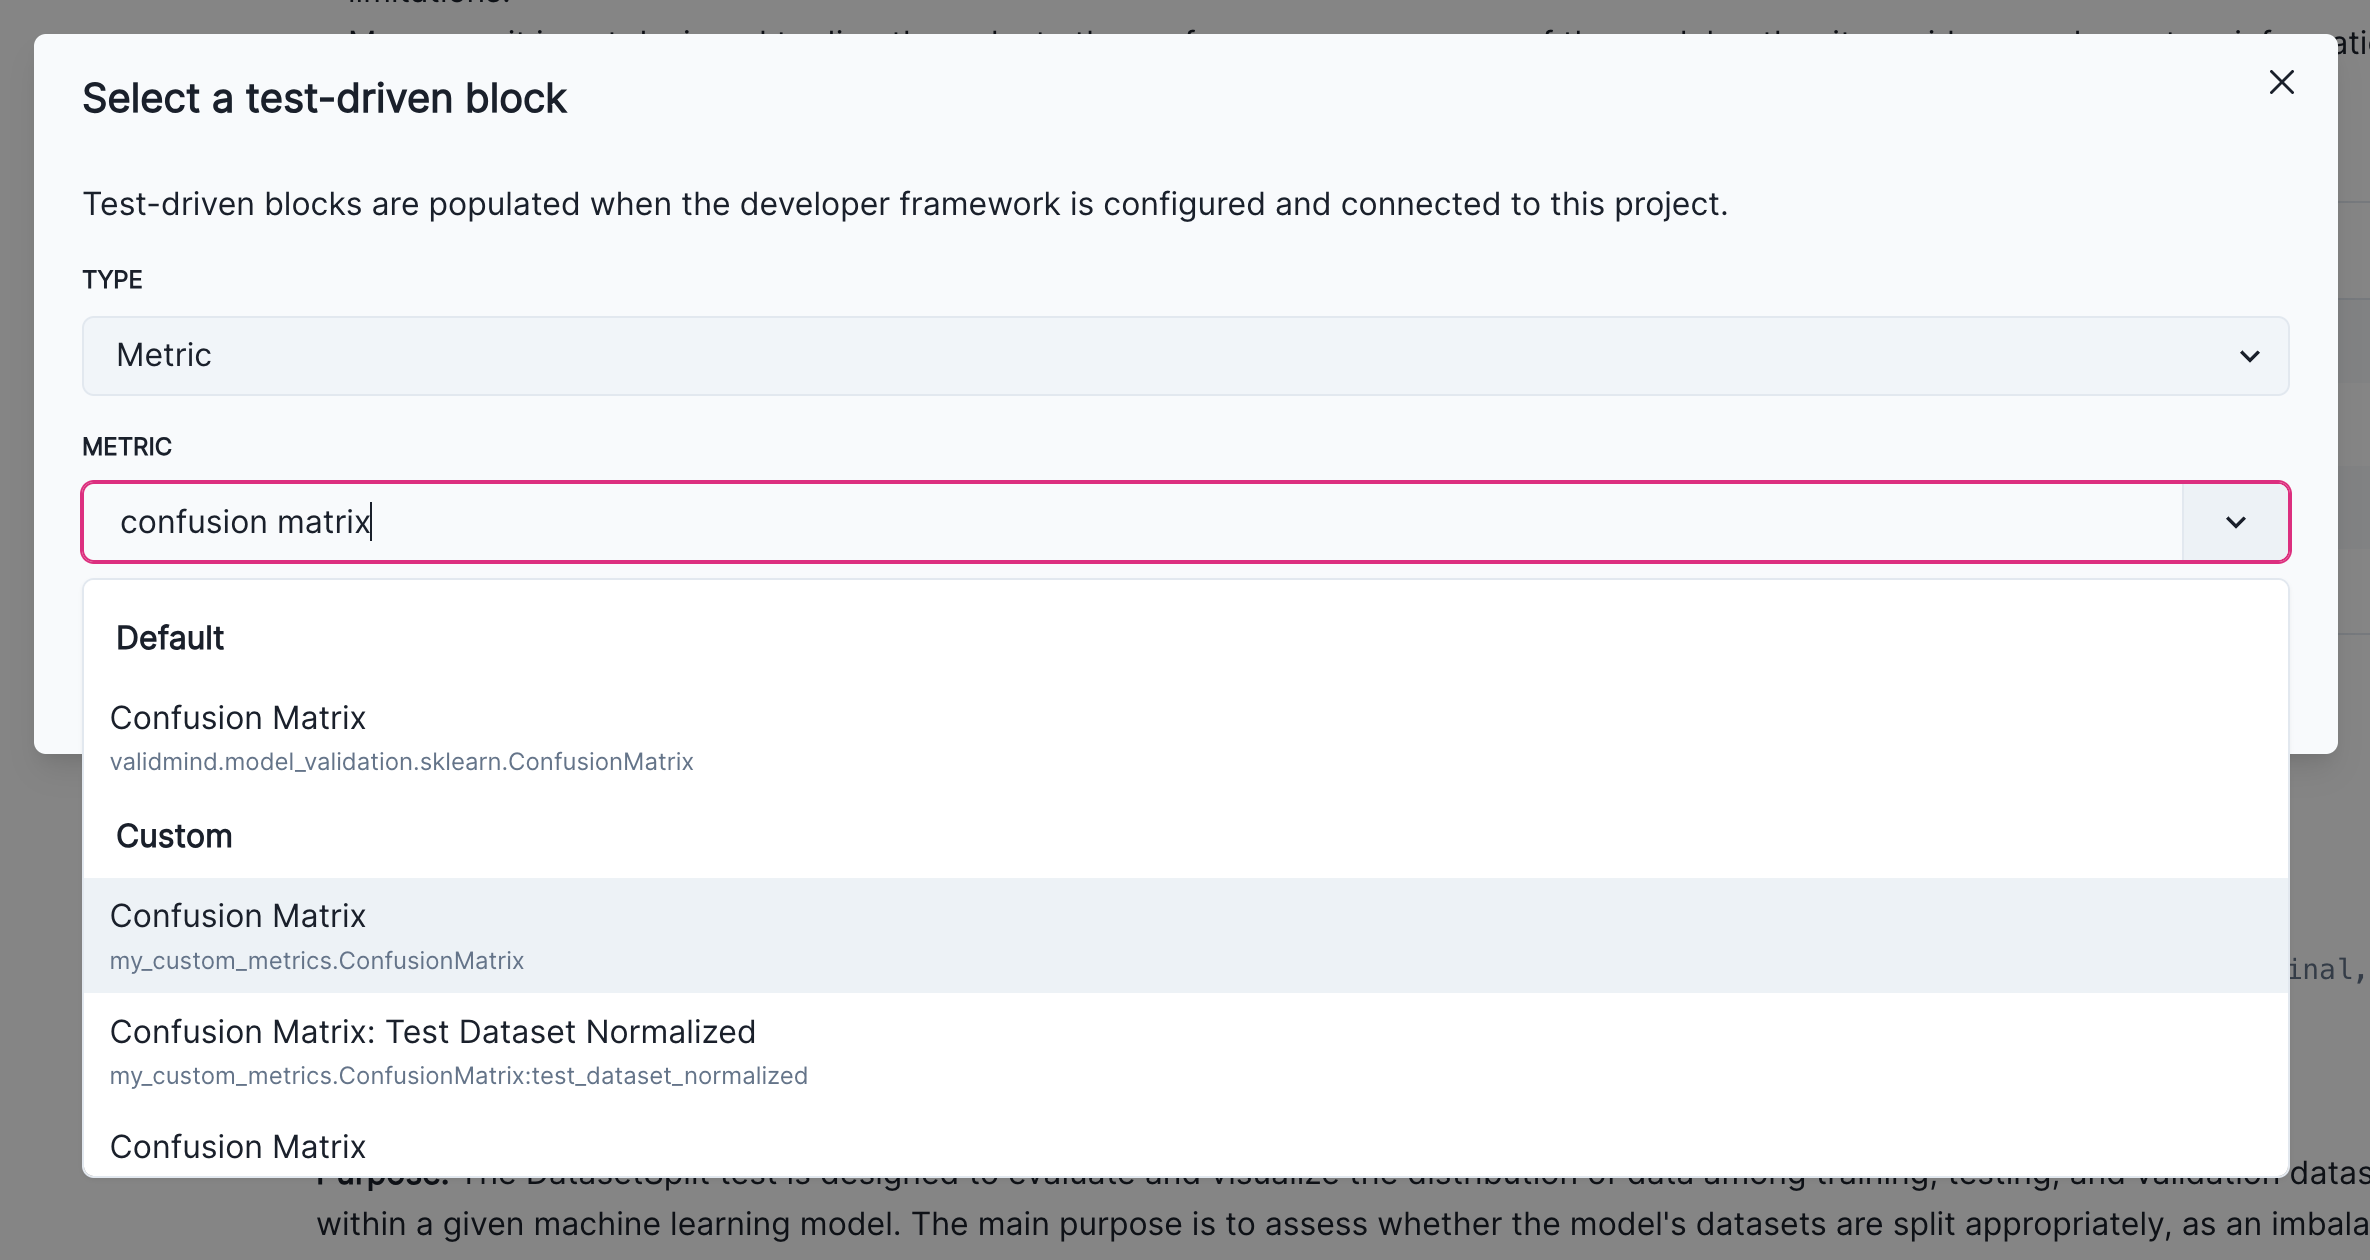
You have already seen how to add individual results to the model documentation using the ValidMind Platform. Let’s repeat the process and add the confusion matrix to the Model Development -> Model Evaluation section of the documentation. The “add test driven block” dialog should now show the new test result coming from the test provider:
4. Finalize testing and documentation
In this section we cover how to finalize the testing and documentation of your model by focusing on:
- Using
run_documentation_tests()to ensure custom test results are included in your documentation - Viewing and updating the configuration for the entire model documentation template
Use run_documentation_tests() to ensure custom test results are included in your documentation
After adding test driven blocks to your model documentation, changes should persist and become available every time you call vm.preview_template(). However, you need to reload the connection to the ValidMind Platform if you have added test driven blocks when the connection was already established.
vm.reload()Now, run preview_template() and verify that the new confusion matrix test you added is included in the proper section.
vm.preview_template()Since the test ID is now registered in the document you can now run tests for an entire section and all additional custom tests should be loaded without issues. Let’s run all tests in the model_evaluation section of the documentation. Note that we have been running the sample custom confusion matrix with normalize=True to demonstrate the ability to provide custom parameters.
In the Run the model evaluation tests section above you learned how to assign inputs to individual tests with run_documentation_tests(). Assigning parametesr is similar, you only need to provide assign a params dictionary to a given test ID, my_test_provider.ConfusionMatrix in this case.
test_config = {
    "validmind.model_validation.sklearn.ClassifierPerformance:in_sample": {
        "inputs": {
            "dataset": vm_train_ds,
            "model": vm_model,
        },
    },
    "my_test_provider.ConfusionMatrix": {
        "params": {"normalize": True},
    },
}
results = vm.run_documentation_tests(
    section=["model_evaluation"],
    inputs={
        "dataset": vm_test_ds,  # Any test that requires a single dataset will use vm_test_ds
        "model": vm_model,
        "datasets": (
            vm_train_ds,
            vm_test_ds,
        ),  # Any test that requires multiple datasets will use vm_train_ds and vm_test_ds
    },
    config=test_config,
)
Viewing and updating the configuration for the entire model documentation template
The ValidMind Library provides a utility function called vm.get_test_suite().get_default_config() that allows you to render the default configuration for the entire documentation template. This configuration will contain all the test IDs and their default parameters. You can then modify this configuration as needed and pass it to run_documentation_tests() to run all tests in the documentation template if needed. You also have the option to continue running tests for one section at a time, get_default_config() still provides a useful reference for providing default parametes to every test.
import json

model_test_suite = vm.get_test_suite()
config = model_test_suite.get_default_config()
print("Suite Config: \n", json.dumps(config, indent=2))
Update the config
Note that the default config does not assign any inputs to a test, this is expected. You can assign inputs to individual tests as needed, depending on the datasets and models you want to pass to individual tests. The config dictionary, as a mapping of test IDs to test configurations, allows you to do this.
For this particular documentation template (binary classification), the ValidMind Library provides a sample configuration that can be used to populate the entire model documentation using the following inputs as placeholders:
- A
raw_datasetraw dataset - A
train_datasettraining dataset - A
test_datasettest dataset - A trained
modelinstance
As part of updating the config you will need to ensure the correct input_ids are used in the final config passed to run_documentation_tests().
from validmind.datasets.classification import customer_churn
from validmind.utils import preview_test_config

test_config = customer_churn.get_demo_test_config()
preview_test_config(test_config)
Using this sample configuration, let’s finish populating model documentation by running all tests for the model_development section of the documentation. Recall that the training and test datasets in our exercise have the following input_id values:
train_dataset_finalfor the training datasettest_dataset_finalfor the test dataset
config = {
    "validmind.model_validation.ModelMetadata": {
        "inputs": {"model": "log_reg_model_v1"},
    },
    "validmind.data_validation.DatasetSplit": {
        "inputs": {"datasets": ["train_dataset_final", "test_dataset_final"]},
    },
    "validmind.model_validation.sklearn.PopulationStabilityIndex": {
        "inputs": {
            "model": "log_reg_model_v1",
            "datasets": ["train_dataset_final", "test_dataset_final"],
        },
        "params": {"num_bins": 10, "mode": "fixed"},
    },
    "validmind.model_validation.sklearn.ConfusionMatrix": {
        "inputs": {"model": "log_reg_model_v1", "dataset": "test_dataset_final"},
    },
    "my_test_provider.ConfusionMatrix": {
        "inputs": {"dataset": "test_dataset_final", "model": "log_reg_model_v1"},
    },
    "validmind.model_validation.sklearn.ClassifierPerformance:in_sample": {
        "inputs": {"model": "log_reg_model_v1", "dataset": "train_dataset_final"}
    },
    "validmind.model_validation.sklearn.ClassifierPerformance:out_of_sample": {
        "inputs": {"model": "log_reg_model_v1", "dataset": "test_dataset_final"}
    },
    "validmind.model_validation.sklearn.PrecisionRecallCurve": {
        "inputs": {"model": "log_reg_model_v1", "dataset": "test_dataset_final"},
    },
    "validmind.model_validation.sklearn.ROCCurve": {
        "inputs": {"model": "log_reg_model_v1", "dataset": "test_dataset_final"},
    },
    "validmind.model_validation.sklearn.TrainingTestDegradation": {
        "inputs": {
            "model": "log_reg_model_v1",
            "datasets": ["train_dataset_final", "test_dataset_final"],
        },
        "params": {
            "metrics": ["accuracy", "precision", "recall", "f1"],
            "max_threshold": 0.1,
        },
    },
    "validmind.model_validation.sklearn.MinimumAccuracy": {
        "inputs": {"model": "log_reg_model_v1", "dataset": "test_dataset_final"},
        "params": {"min_threshold": 0.7},
    },
    "validmind.model_validation.sklearn.MinimumF1Score": {
        "inputs": {"model": "log_reg_model_v1", "dataset": "test_dataset_final"},
        "params": {"min_threshold": 0.5},
    },
    "validmind.model_validation.sklearn.MinimumROCAUCScore": {
        "inputs": {"model": "log_reg_model_v1", "dataset": "test_dataset_final"},
        "params": {"min_threshold": 0.5},
    },
    "validmind.model_validation.sklearn.PermutationFeatureImportance": {
        "inputs": {"model": "log_reg_model_v1", "dataset": "test_dataset_final"},
    },
    "validmind.model_validation.sklearn.SHAPGlobalImportance": {
        "inputs": {"model": "log_reg_model_v1", "dataset": "test_dataset_final"},
        "params": {"kernel_explainer_samples": 10},
    },
    "validmind.model_validation.sklearn.WeakspotsDiagnosis": {
        "inputs": {
            "model": "log_reg_model_v1",
            "datasets": ["train_dataset_final", "test_dataset_final"],
        },
        "params": {
            "thresholds": {"accuracy": 0.75, "precision": 0.5, "recall": 0.5, "f1": 0.7}
        },
    },
    "validmind.model_validation.sklearn.OverfitDiagnosis": {
        "inputs": {
            "model": "log_reg_model_v1",
            "datasets": ["train_dataset_final", "test_dataset_final"],
        },
        "params": {"cut_off_percentage": 4},
    },
    "validmind.model_validation.sklearn.RobustnessDiagnosis": {
        "inputs": {
            "model": "log_reg_model_v1",
            "datasets": ["train_dataset_final", "test_dataset_final"],
        },
        "params": {
            "scaling_factor_std_dev_list": [0.0, 0.1, 0.2, 0.3, 0.4, 0.5],
            "accuracy_decay_threshold": 4,
        },
    },
}


full_suite = vm.run_documentation_tests(
    section="model_development",
    config=config,
)
Where to go from here
In this notebook you have learned the end-to-end process to document a model with the ValidMind Library, running through some very common scenarios in a typical model development setting:
- Running out-of-the-box tests
- Documenting your model by adding evidence to model documentation
- Extending the capabilities of the ValidMind Library by implementing custom tests
- Ensuring that the documentation is complete by running all tests in the documentation template
As a next step, you can explore the following notebooks to get a deeper understanding on how the ValidMind Library allows you generate model documentation for any use case:
Use cases
More how-to guides and code samples
Discover more learning resources
All notebook samples can be found in the following directories of the ValidMind Library GitHub repository:
Upgrade ValidMind
After installing ValidMind, you’ll want to periodically make sure you are on the latest version to access any new features and other enhancements.
Retrieve the information for the currently installed version of ValidMind:
%pip show validmindIf the version returned is lower than the version indicated in our production open-source code, restart your notebook and run:
%pip install --upgrade validmindYou may need to restart your kernel after running the upgrade package for changes to be applied.