Training for Model Validators

Click to start

Learning objectives

“As a validator who is new to ValidMind, I want to learn how to review model documentation, prepare my validation report, and submit it for approval.”

In this training module

    1. Review documentation
    1. Analyze test results
    1. Prepare validation reports
    1. Submit for review and approval

First, let’s make sure you can log in and show you around.

Training is interactive —you explore ValidMind live. Try it!

, , SPACE , N — next slide     , , P , H — previous slide     ? — all keyboard shortcuts

Can you log in?

To try out this training module, you need to have been onboarded onto ValidMind Academy with the Validator role.


Log in to check your access:

Be sure to return to this page afterwards.

You’re in — let’s show you around ValidMind.

This is the ValidMind Platform UI.

From here, you have access to:

  • Model inventory
  • Documentation & test results
  • Validation reports
  • Model findings
  • Reports

Try it live on the next page.

From the Model Inventory,
you access:

  • Model documentation
  • Validation reports
  • Getting started for
    developers

Explore some models, then
click to continue.

From Model Findings,
you track:

  • Major or minor issues
  • Deficiencies
  • Model limitations
  • Robustness concerns
  • And more!

Explore existing findings,
then click to continue.

Under Reports, you can
find:

  • Executive summaries
  • Model tracking
  • Risk assessments
  • Compliance review
  • Remediation tracking

Explore existing reports,
then click to continue.

1. Review documentation

Evaluate the conceptual soundness, data preparation, model development, and ongoing monitoring and governance plans for the model.

Review model documentation

The Document Overview shows a section-by-section outline of your model’s documentation, as well as summaries of:

  • Any unresolved conversations
  • The number of model findings
  • The completion status for your model’s documentation
  • Recent activity on your model

To locate your document overview for a model:

  1. In the left sidebar, click Model Inventory.

  2. Select a model by clicking on it or find your model by applying a filter or searching for it.

  3. In the left sidebar that appears for your model, click Documentation.

Try it live on the next page.

Review the documentation for the [Quickstart] Customer Churn Model.

When you are done, click to continue.

Have a question about the model? Collaborate with your developer right in the model documentation.

  1. In any section of the model documentation, select the portion of text you want to comment on, and click the Comment button in the toolbar.

  2. Enter your comment and click Comment.

  3. You can view the comment by clicking the highlighted text. Comments will also appear in the right sidebar.

  1. Click the highlighted text portion to view the comment thread.

  2. Enter your comment and click Reply.

  3. You can view the comment thread by clicking the highlighted text.

  1. Click the highlighted text portion to view the thread, then click to resolve the thread.

  2. To view the resolved comment thread, click the Comment archive button in the toolbar. You can view a history of all archived comments in the Comment archive.

  3. To reopen a comment thread, reply to the comment thread in the Comment archive or click the Reopen button that appears next to the highlighted text portion.


Try it live on the next page.

In the documentation, post a comment, reply to it, and then resolve the comment thread. Review your comments in the Recent Activity feed on the front page.

When you are done, click to continue.

2. Analyze test results

Locate the test results in the documentation, review the data, and identify issues with the model.


Try it live on the next page.

To locate your document overview for a model:

  1. In the left sidebar, click Model Inventory.

  2. Select a model by clicking on it or find your model by applying a filter or searching for it.

  3. In the left sidebar that appears for your model, click Documentation.

  1. Review the sections:

      1. Data Preparation
      1. Model Development

In the documentation, review 2. Data Preparation and 3. Model Development.

When you are done, click to continue.

3. Prepare validation reports

Based on your review of the documentation, add some findings for your validation report.


Try it live on the next page.

Add findings

As part of the validation process, you may find issues with the model documentation that must be resolved. To indicate that there is an issue and to track the resolution, you add a new finding.

  • Findings are logged with your model documentation.
  • You can add findings both on the main documentation overview page and in each documentation section.
  1. Select a model by clicking on it or find your model by applying a filter or searching for it.

  2. In the left sidebar that appears for your model, click Documentation.

    You can now either log a finding on this overview page, or via a specific documentation section. Both methods will allow you to associate a finding with a documentation section.

Add some findings for your validation report.

When you are done, click to continue.

Link your findings and the evidence from the test results you analyzed to the validation report.


Try it live on the next page.

  1. Select a model by clicking on it or find your model by applying a filter or searching for it.

  2. In the left sidebar that appears for your model, click Validation Report and then locate 2. Validation.

    You can now expand any subsection of the validation report you would like to work with.

    For example: Select 2.1.1. Assumptions.

  3. In any section of the documentation where the button is available, click Link Finding to Report.

    A screenshot of the validation report section 2.1.1. that shows a compliance assessment with the option to link to finding

  4. On the Link Finding to Report page that opens, select from the list of available findings, or create a new finding.

  5. Click Update Linked Findings.

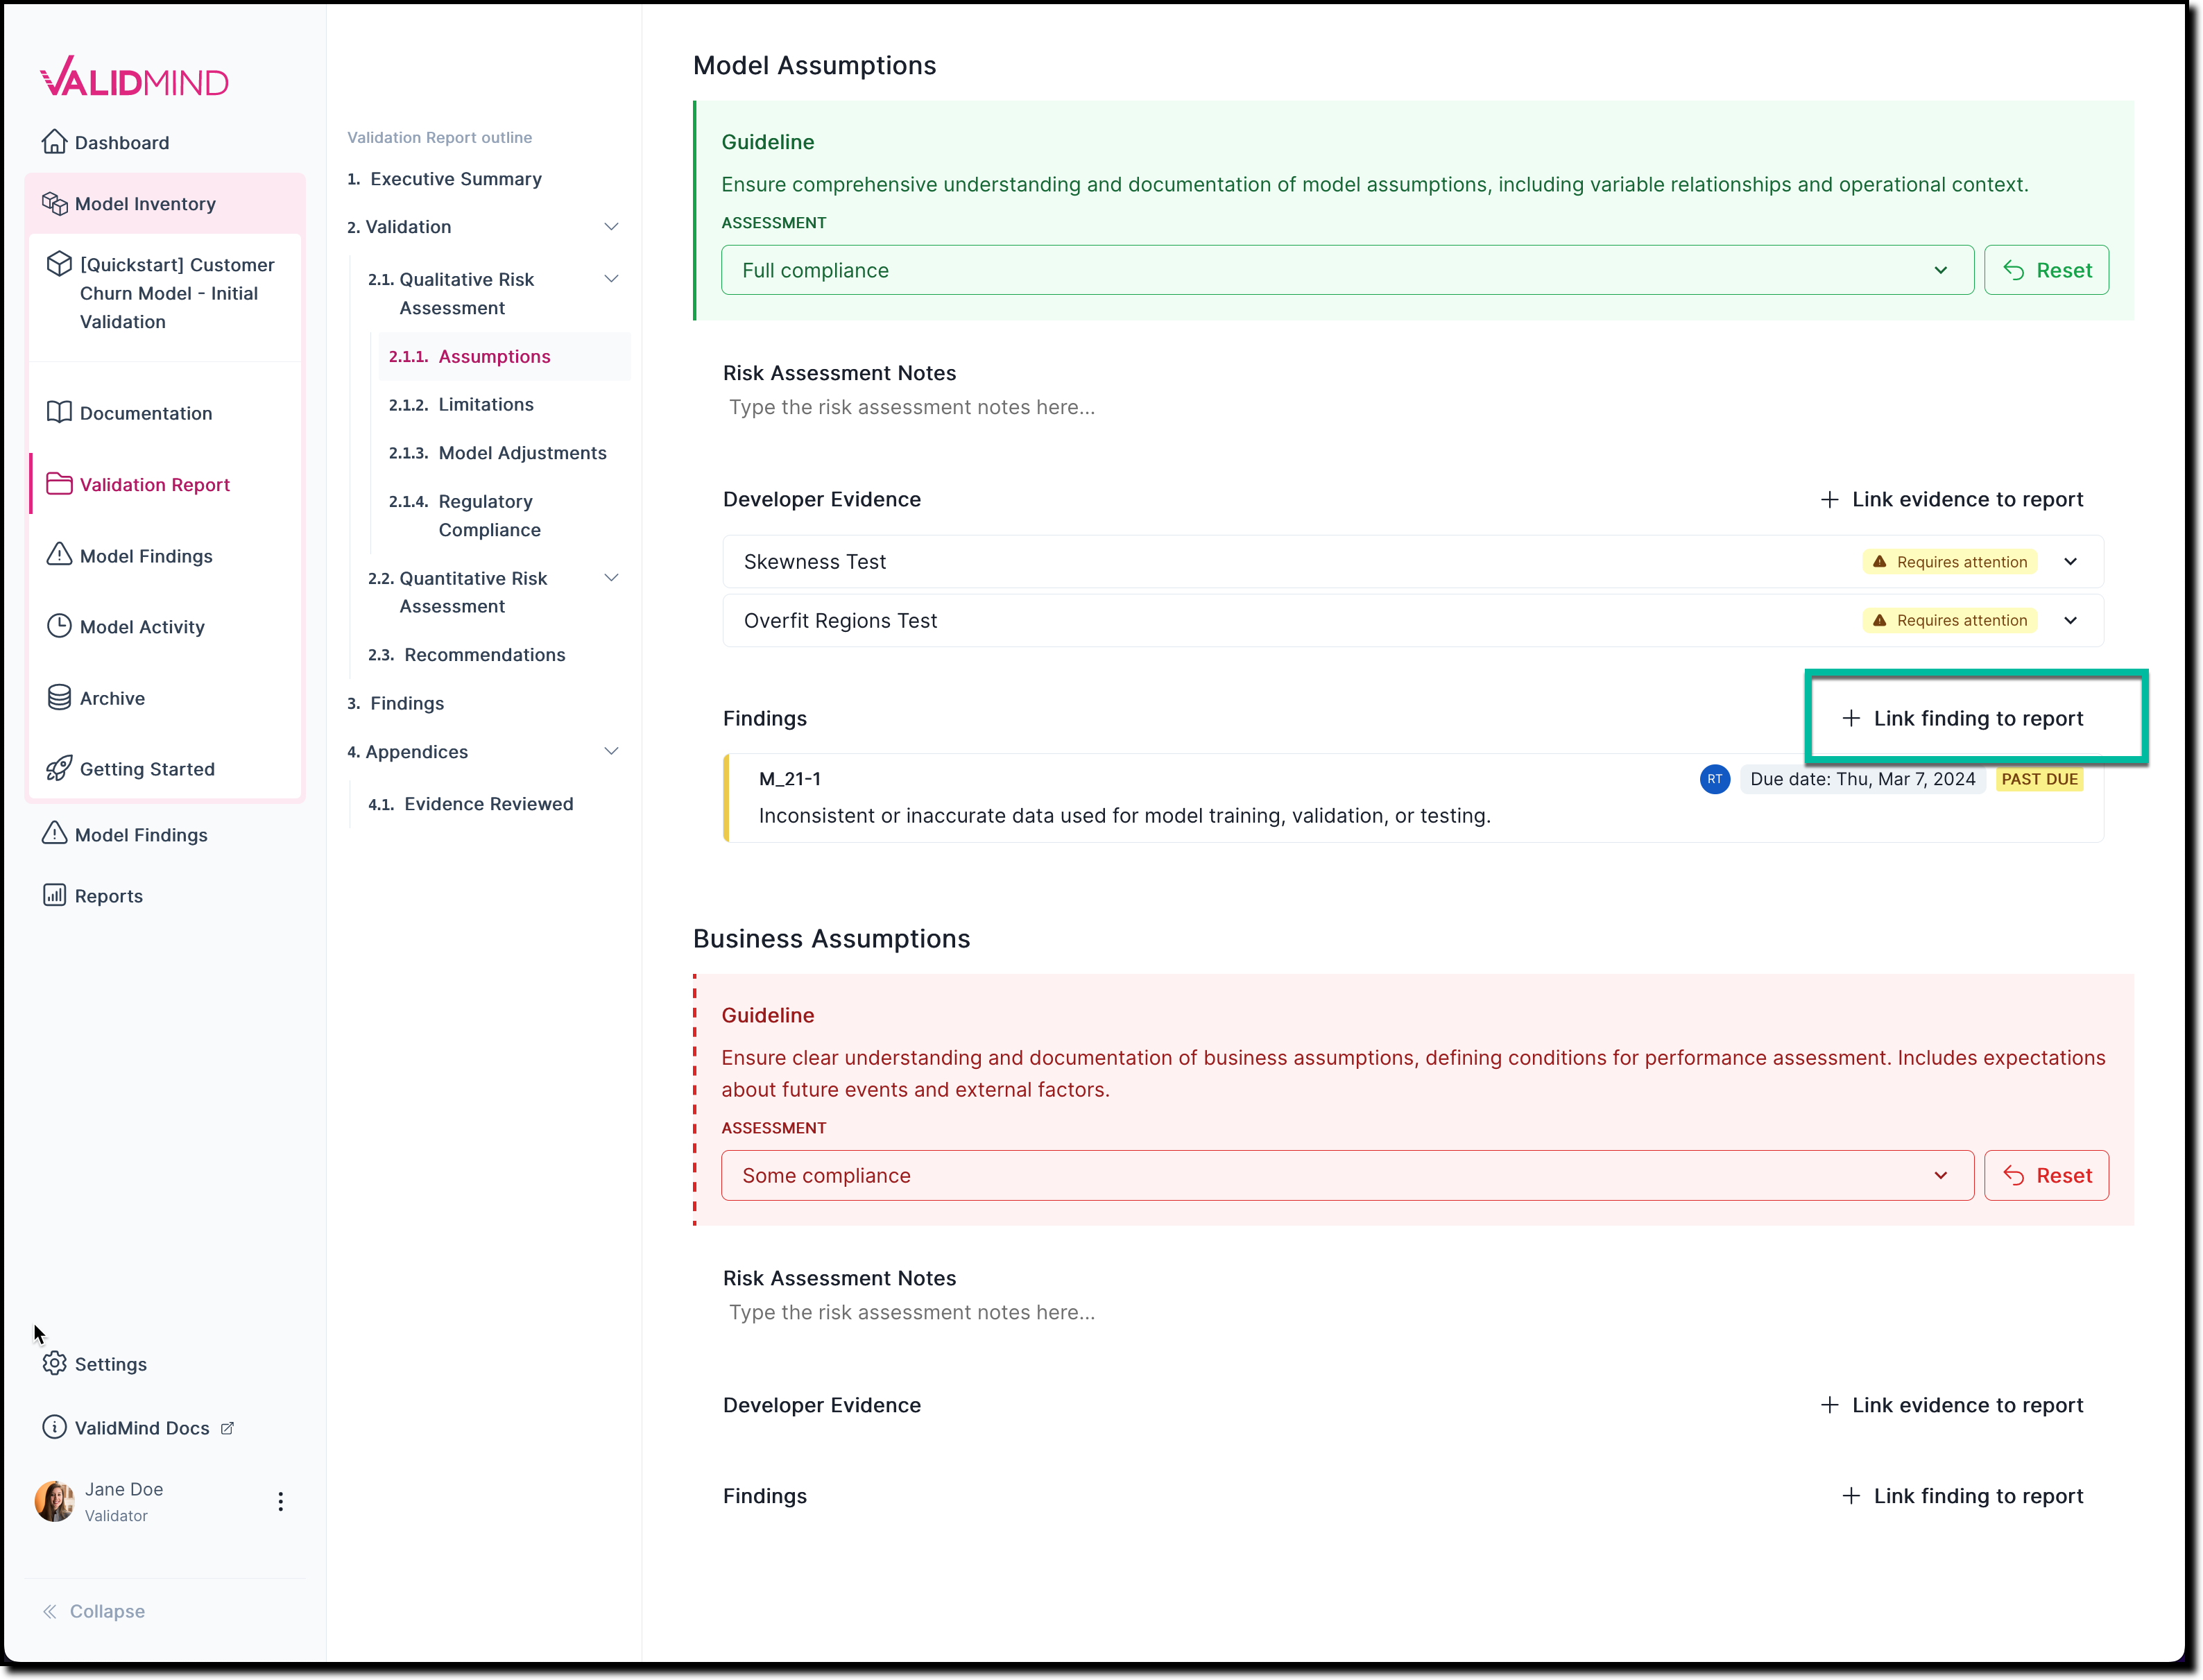
The newly linked-to finding now gets shown under Findings.

  1. Select a model by clicking on it or find your model by applying a filter or searching for it.

  2. In the left sidebar that appears for your model, click Validation Report and then locate 2. Validation.

    You can now expand any subsection of the validation report you would like to work with.

    For example: Select 2.1.1. Assumptions.

  3. In any section of the documentation where the button is available, click Link Evidence to Report.

    A screenshot of the validation report section 2.1.1. that shows a compliance assessment with the option to link to evidence

  4. On the Link Evidence to Validation Report page that opens, select the evidence that is related to your assessment.

    If you are not sure if something is relevant, click to expand the section for more details.

  5. Click Update Linked Evidence.

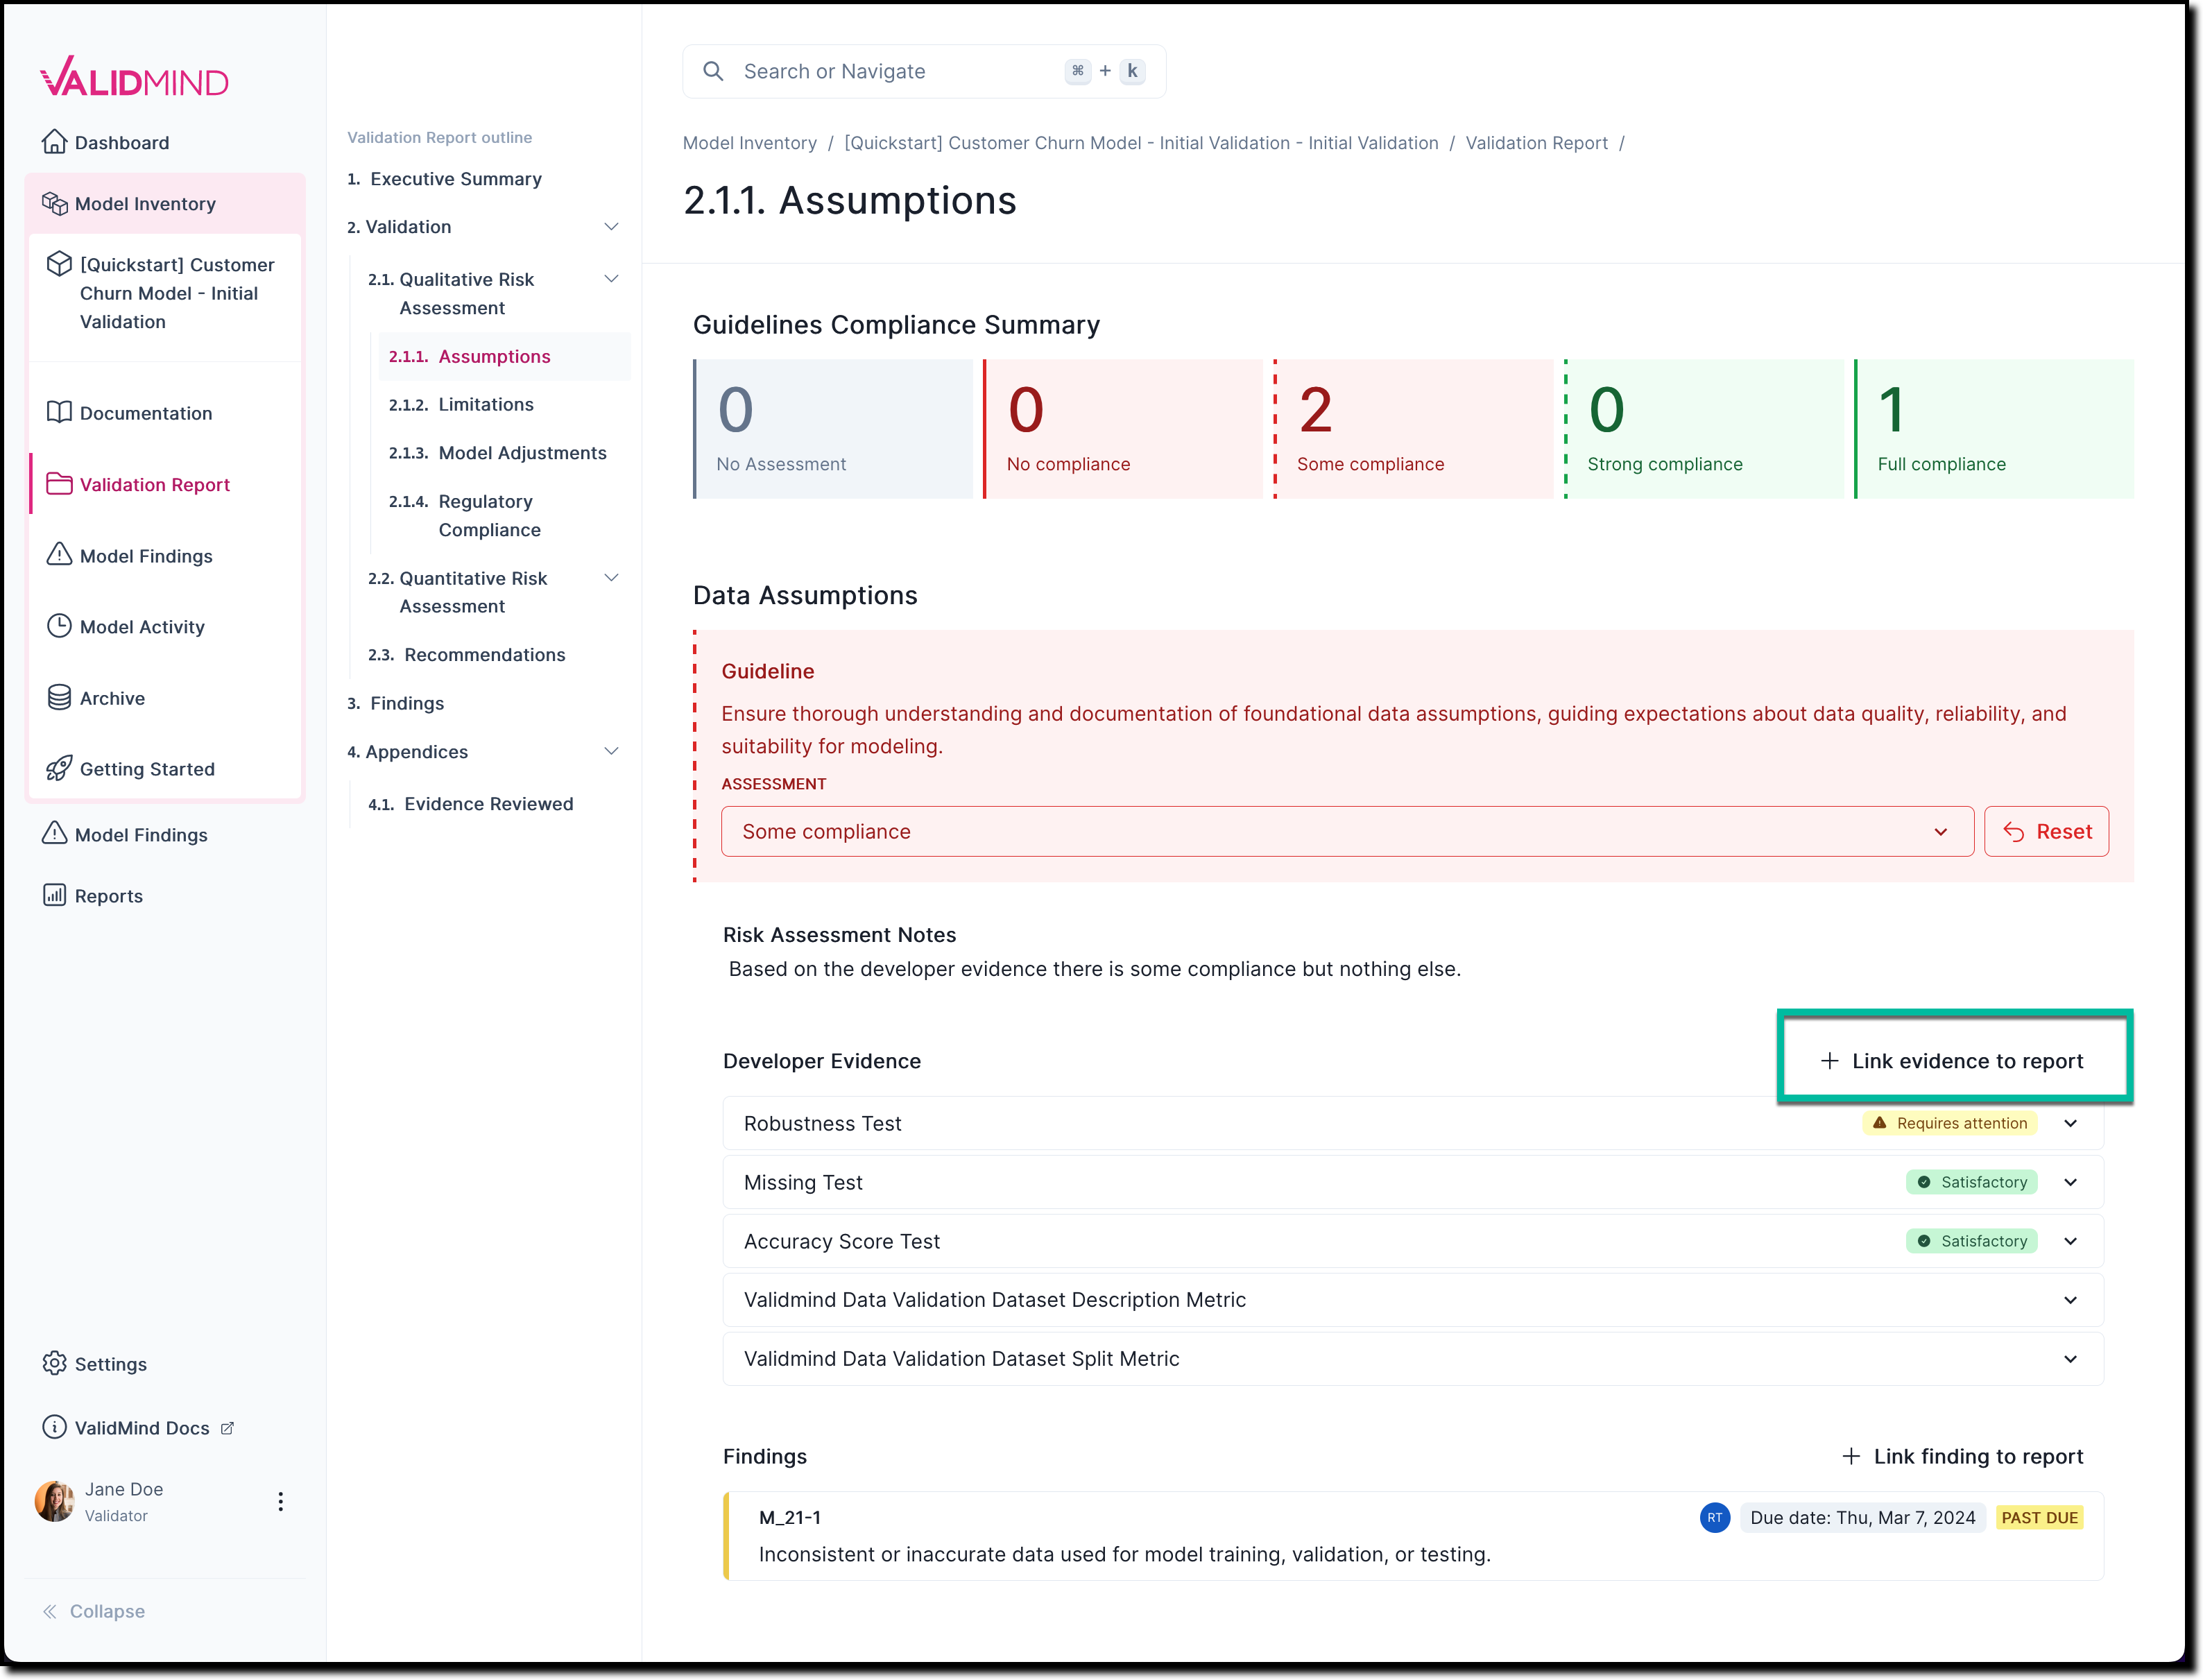
The newly linked-to evidence now gets shown under Developer Evidence.

Link findings and link evidence to your validation report.

When you are done, click to continue.

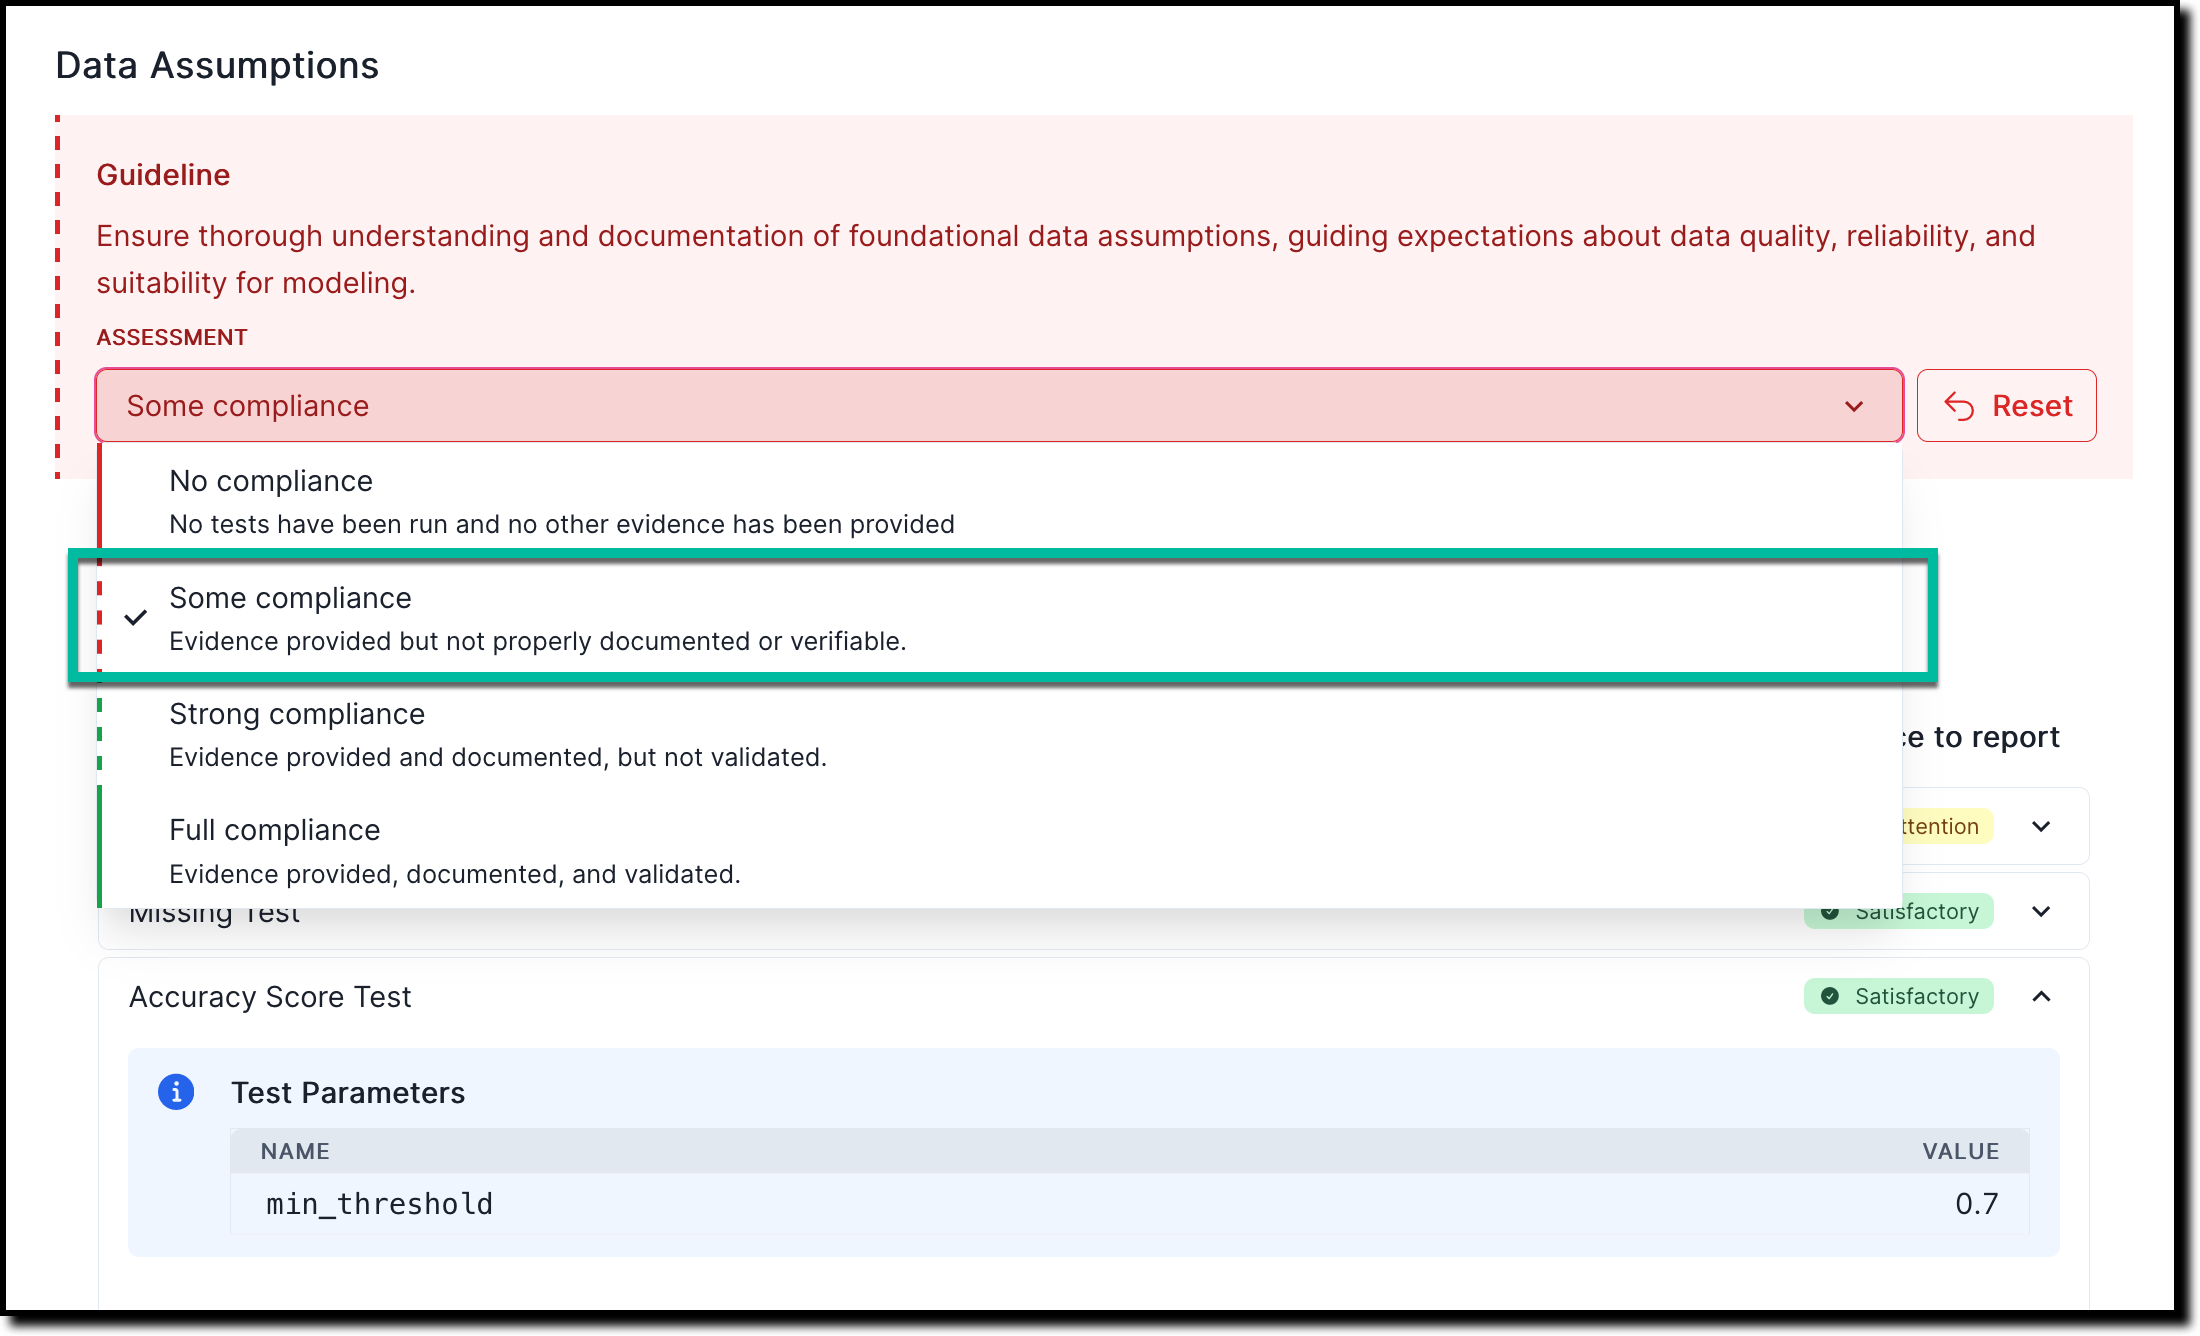
Based on the evidence you analyzed and your model, assess compliance with your guidelines.

(Scroll down for the full instructions.)


Try it live on the next page.

Assess compliance

  1. Select a model by clicking on it or find your model by applying a filter or searching for it.

  2. In the left sidebar that appears for your model, click Validation Report and then locate 2. Validation.

    You can now expand any subsection of the validation report you would like to work with.

    For example: Select 2.1.1. Assumptions.

  3. In any section of the documentation where the Assessment dropdown menu is available, select one of the available options:

    • No compliance — No tests have been run and no other evidence has been provided
    • Some compliance — Evidence provided but not properly documented or verifiable
    • Strong compliance — Evidence provided and documented, but not validated
    • Full compliance — Evidence provided, documented, and validated

    For example: To indicate that there is some compliance based on the evidence or findings you linked to:

    A screenshot of the validation report section 2.1.1. that shows a compliance assessment with the option to link to finding

  4. On the Link Finding to Report page that opens, select from the list of available findings, or create a new finding.

  5. Under Risk Assessment Notes, add any relevant notes that explain your assessment further.

A compliance summary gets shown for each subsection under 2. Validation and provides a quick overview for current qualitative and quantitative risk assessments:

A screenshot of the risk assessment compliance summary

Assess compliance for your validation report.

When you are done, click to continue.

4. Submit for review and approval

When you’re ready, verify the approval workflow, and then submit your validation report for approval.

(Scroll down for the full instructions.)


Try it live on the next page.

Workflow states and transitions are configured by an administrator in advance, but you should verify that the expected people are included in the approval process.

  1. Select a model by clicking on it or find your model by applying a filter or searching for it.

  2. On the landing page of your model, locate the model status section:

    • Click See Workflow to open the detailed workflow associated with that model.
    • The current workflow state will be highlighted on this detail view.

While your lifecycle statuses and workflows are custom to your organization, some examples are:

  • In Documentation — The model is currently being documented and can be submitted for validation next.
  • In Validation — The model is currently being validated and can be submitted for review and then approval.

To transition through the approval workflow, all required workflow steps must be completed. For example, you cannot submit a validation report for review until the model documentation itself has been submitted.

  1. Select a model by clicking on it or find your model by applying a filter or searching for it.

  2. If an action is available to your role, you’ll see it listed under your model status on the model’s landing page.

    • Click to open up the transition panel for your selected action. This arrow will be followed by the action name.
    • Enter your Notes then click Submit.

While your lifecycle statuses and workflows are custom to your organization, some examples are:

  • To submit model documentation for validation — Click Ready for Validation to indicate that a model developer has completed the initial model documentation and is ready to have it validated. Add any notes that need to be included and then click Ready for Validation.
  • To submit validation reports for review and approval — Click Ready for Review to indicate that you have completed your initial model validation report, fill in the mandatory notes, and submit.
  • To request revisions to model documentation or validation reports — Click Request Revision, fill in the mandatory notes to explain the changes that are required, and submit.
  • To have your model documentation and validation report approved — Click Ready for Approval, fill in the mandatory notes, and submit.

Verify the workflow, then submit your validation report for review & approval.

When you are done, click to continue.

About validation reports

There is more that ValidMind can do to help you prepare validation reports, from using your own template to configuring the full approval workflow.

Or, find your next learning resource on ValidMind Academy.